How to Seal Tonneau Cover: Setup Steps and Troubleshooting Tips
Imagine driving down the highway, a sudden downpour hits, and you arrive at your destination only to find your valuable tools, camping gear, or groceries soaking wet beneath your tonneau cover. Or perhaps you’ve noticed fine dust coating everything in your truck bed after a trip down a gravel road. These frustrating scenarios are all too common when a tonneau cover isn’t properly sealed. A poorly sealed cover isn’t just an inconvenience; it can lead to damaged cargo, rust formation in your truck bed, and even reduced fuel efficiency due to air leaks.
Achieving a watertight and dust-proof seal for your tonneau cover is crucial for protecting your investment and ensuring the longevity of your truck bed and its contents. While many tonneau covers are designed to be weather-resistant, the reality is that perfect factory seals are rare, and over time, wear and tear or improper installation can compromise their effectiveness. Understanding the common leak points and the various methods available to address them can save you a significant amount of hassle and expense down the road.
This comprehensive guide will walk you through the essential steps and practical tips on how to seal tonneau cover effectively, ensuring your cargo stays dry and clean, no matter the weather or road conditions. I’ll cover everything from identifying potential leak sources to selecting the right sealing materials and executing the installation process with precision. My goal is to equip you with the knowledge to achieve a superior seal, giving you peace of mind on every journey.
Understanding Common Tonneau Cover Leak Points
Before diving into sealing solutions, it’s vital to understand where leaks typically originate. Identifying these common trouble spots will help you focus your efforts and select the most effective sealing strategies. Many owners mistakenly assume their cover is inherently flawed when, in reality, minor adjustments or additional sealing can resolve most issues.
The Bulkhead (Front Rail) Area
The bulkhead, or the front rail of your truck bed closest to the cab, is one of the most notorious areas for water intrusion. This is often where the tonneau cover’s front rail meets the truck bed. Several factors contribute to leaks here:
- Uneven Bed Rails: Truck beds are not always perfectly level or uniform. Slight variations can create gaps between the tonneau cover’s front rail and the truck’s bulkhead.
- Factory Bed Caps: Some trucks come with plastic bed caps that don’t always provide a flush surface, creating channels for water to flow under the cover.
- Drain Holes: While many tonneau covers include drain tubes, if these are clogged, improperly routed, or not present, water can pool and eventually find its way into the bed.
- Washers and Gaskets: The bolts or clamps holding the front rail might not have sufficient washers or gaskets, allowing water to seep through bolt holes.
Side Rails and Bed Caps
The long side rails of your truck bed, where the tonneau cover clamps or attaches, are another critical area. Leaks here are often due to:
- Insufficient Weatherstripping: The weatherstripping supplied with the tonneau cover might be too thin, worn out, or improperly installed, leaving gaps between the cover and the bed rails.
- Bed Cap Design: Similar to the bulkhead, the design of your truck’s plastic bed caps can create small channels or uneven surfaces that prevent a tight seal. Water can run along these channels and under the cover.
- Rail Alignment: If the tonneau cover rails are not perfectly aligned or are slightly warped, they won’t sit flush against the truck bed, creating gaps.
- Clamp Pressure: Insufficient or uneven pressure from the clamps holding the side rails can also lead to gaps.
Tailgate Area
The tailgate is a complex area with multiple potential leak points, especially when considering the gap between the tailgate and the truck bed itself. This area is particularly vulnerable to dust and water splashing up from the road.
- Gap Between Tailgate and Bed: There’s almost always a gap between the bottom of the tailgate and the truck bed floor, as well as between the sides of the tailgate and the truck’s body panels.
- Tailgate Design: Some tailgates have more pronounced contours or larger gaps than others, making them harder to seal effectively.
- Wear and Tear: Over time, the factory seals around the tailgate can wear down, creating new pathways for water and dust.
- Hinges and Latches: While less common, water can sometimes seep through the tailgate’s hinge points or around the latch mechanisms if they are not properly sealed.
Drainage System Issues
Many modern tonneau covers, especially hard folding or retractable types, incorporate a drainage system with tubes that route water out of the truck bed. Problems can arise if:
- Clogged Drains: Debris, leaves, or dirt can clog the drain tubes, causing water to back up and overflow into the bed.
- Improper Routing: Drain tubes might be kinked, pinched, or routed in a way that creates a high point, preventing proper drainage.
- Missing or Damaged Tubes: Sometimes, tubes are missing, or they become disconnected or damaged, rendering the drainage system ineffective.
- Insufficient Capacity: In heavy downpours, the drainage system might simply be overwhelmed, especially if the cover isn’t perfectly level.
Other Less Common Leak Sources
While the above areas are the most frequent culprits, I’ve also seen leaks from:
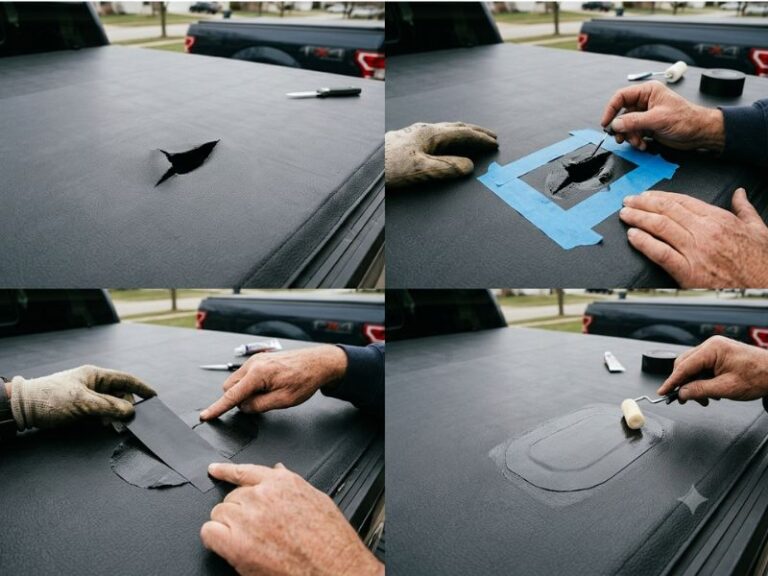
- Tonneau Cover Material Damage: Tears, punctures, or degraded material on the cover itself can lead to leaks. This is more common with soft roll-up covers.
- Seams and Hinges (Folding Covers): On hard folding covers, the seams between panels or the hinge points can sometimes leak if the seals are compromised or damaged.
- Mounting Hardware: Rarely, but possible, water can seep through the mounting points of the tonneau cover rails if the bolts or screws aren’t properly sealed with silicone or rubber washers.
By systematically inspecting these areas, you can pinpoint the exact source of your leaks and apply targeted solutions, saving time and resources.
Essential Tools and Materials for Sealing Your Tonneau Cover
Before you begin the sealing process, gathering the right tools and materials is crucial. Having everything on hand will make the job smoother and more efficient. I always recommend having a few extra items just in case, as you never know what you might encounter.
Basic Tools You’ll Need
- Utility Knife or Scissors: For cutting weatherstripping and seals to size. A sharp blade is essential for clean cuts.
- Measuring Tape: To accurately measure the lengths of weatherstripping required.
- Cleaning Supplies:
- Rubbing Alcohol or Isopropyl Alcohol: For thoroughly cleaning surfaces before applying adhesive seals. This removes dirt, grease, and wax, ensuring proper adhesion.
- Clean Rags or Microfiber Cloths: For applying alcohol and wiping down surfaces.
- Gloves: To protect your hands from sealants and adhesives, and to keep surfaces clean.
- Work Light or Flashlight: Especially useful for inspecting dark corners of the truck bed and identifying subtle gaps.
- Marker or Pencil: For marking cut lines on seals.
- Caulking Gun (if using silicone sealant): For smooth and even application of silicone.
Sealing Materials and Products
The type of material you choose will depend on the specific leak point and the type of tonneau cover you have. I’ll break down the most common and effective options:
1. EPDM Rubber Weatherstripping
- Description: EPDM (Ethylene Propylene Diene Monomer) rubber is highly durable, resistant to UV rays, extreme temperatures, and moisture. It comes in various shapes and sizes, including D-shaped, P-shaped, and rectangular strips, often with a strong adhesive backing.
- Best Use: Ideal for sealing gaps along the bulkhead, side rails, and around the tailgate. It’s flexible enough to conform to uneven surfaces and provides an excellent compression seal.
- Considerations: Choose a thickness and shape appropriate for the gap you’re trying to fill. For example, a D-shaped seal is excellent for larger gaps, while a thinner rectangular strip might work for smaller ones.
2. Foam Weatherstripping
- Description: Typically made from closed-cell foam, this material is less durable than EPDM but can be very effective for certain applications. It’s often self-adhesive.
- Best Use: Good for smaller, less critical gaps, or as a secondary seal. It’s often used for tailgate seals where the compression is less intense.
- Considerations: Ensure it’s closed-cell foam, as open-cell foam will absorb water. It tends to degrade faster than EPDM rubber, especially when exposed to UV light and friction.
3. Silicone Sealant (RTV Silicone)
- Description: RTV (Room Temperature Vulcanizing) silicone is a highly flexible, waterproof sealant that cures into a durable rubber. It’s excellent for filling irregular gaps and creating a permanent seal.
- Best Use: Perfect for sealing around bolt holes, small gaps where the bed liner meets the bed rails, or any area where a strip seal won’t fit perfectly. It’s also great for sealing the ends of weatherstripping.
- Considerations: Choose a clear or black silicone that is exterior-grade and resistant to UV and temperature extremes. Allow adequate curing time, which can range from a few hours to 24 hours depending on the product and humidity.
4. Butyl Tape (Butyl Rubber Sealant Tape)
- Description: A sticky, pliable, and waterproof tape often used in automotive and RV applications. It forms a strong, permanent, and flexible seal.
- Best Use: Excellent for sealing under bed caps, around the front bulkhead where the bed liner meets the truck bed, or any area where you need a robust, long-lasting, and conformable seal that can be compressed.
- Considerations: It can be messy to work with due to its stickiness. Ensure surfaces are clean and dry for optimal adhesion.
5. Tailgate Seal Kits
- Description: These are specialized kits designed specifically to seal the gaps around your truck’s tailgate. They typically include a combination of EPDM rubber seals and sometimes foam strips, cut to fit the contours of the tailgate.
- Best Use: The most effective solution for sealing the tailgate area, addressing gaps at the bottom and sides.
- Considerations: Ensure you purchase a kit compatible with your specific truck make, model, and year for the best fit.
6. Drain Tubes and Connectors (if applicable)
- Description: If your tonneau cover has a drainage system, ensure the tubes are clear, properly connected, and routed. You might need replacement tubes or connectors if yours are damaged or missing.
- Best Use: For maintaining or repairing the existing drainage system of hard folding or retractable tonneau covers.
- Considerations: Ensure the tubes are routed to drain water out of the truck bed, typically through existing stake pockets or drilled holes (if comfortable drilling).
By carefully selecting the appropriate materials for each specific leak point, you can create a comprehensive and durable seal for your tonneau cover.
Step-by-Step Guide: How to Seal Tonneau Cover Effectively
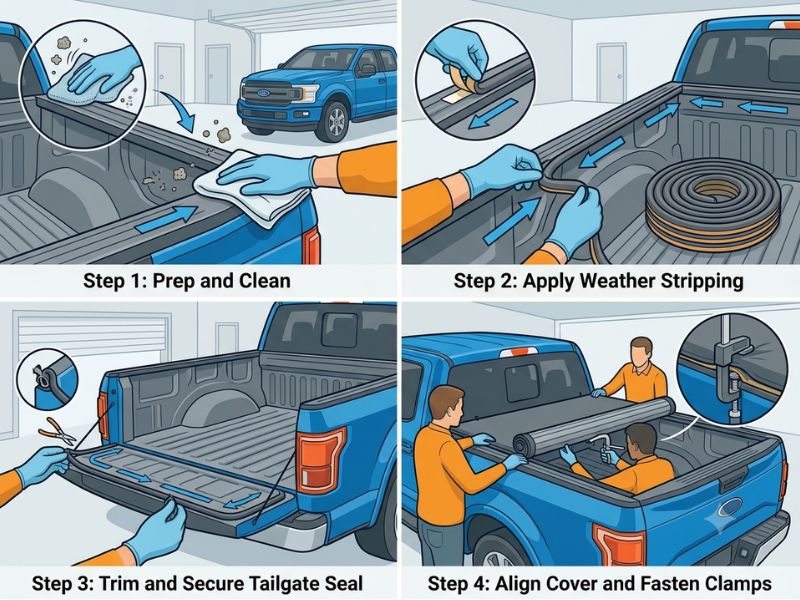
Sealing your tonneau cover is a systematic process that requires patience and attention to detail. I’ll walk you through the general steps, focusing on the most common leak areas. Remember to adapt these steps based on your specific tonneau cover type and truck model.
Step 1: Thoroughly Clean and Prepare the Truck Bed
This is arguably the most critical step. Any dirt, dust, grease, or wax on the surfaces will prevent adhesive seals from sticking properly, leading to premature failure. I cannot stress enough the importance of a clean surface.
- Wash the Truck Bed: Start by thoroughly washing your entire truck bed, especially the bed rails, bulkhead, and tailgate area. Use soap and water to remove major grime.
- Dry Completely: Allow the truck bed to dry completely. You can use a leaf blower or compressed air to speed up the process and remove water from crevices.
- Degrease and Prep: Wipe down all surfaces where seals will be applied with rubbing alcohol or isopropyl alcohol. This removes any remaining wax, oil, or residue. Use clean rags and change them frequently. Allow the alcohol to evaporate fully before proceeding.
- Remove Old Seals (if applicable): If you’re replacing old, worn-out seals, carefully remove them. Use a plastic scraper if necessary to avoid damaging the paint or bed liner. Clean any adhesive residue left behind with an appropriate adhesive remover, then re-clean with alcohol.
Step 2: Seal the Bulkhead (Front Rail) Area
The bulkhead is a primary leak point. Addressing it first often solves a significant portion of water intrusion issues.
- Inspect the Gap: With your tonneau cover’s front rail in place (but not fully clamped down), visually inspect the gap between the rail and the truck’s bulkhead. Pay attention to any factory plastic bed caps.
- Apply Bulkhead Seal:
- Option A (EPDM Weatherstripping): Measure the length of the bulkhead. Cut a piece of D-shaped or rectangular EPDM weatherstripping to size. Apply it along the top edge of the bulkhead, ensuring it sits flush and creates a good compression seal when the tonneau cover’s front rail is lowered. If your truck has plastic bed caps, you might need to apply the seal directly to the underside of the tonneau cover’s front rail instead, so it compresses against the bed cap.
- Option B (Butyl Tape): For larger or more irregular gaps, especially under plastic bed caps, butyl tape can be very effective. Apply a strip of butyl tape along the top edge of the bulkhead or directly to the underside of the tonneau cover’s front rail. It will conform to the shape and create a strong seal when compressed.
- Seal Bolt Holes/Gaps: If you notice any small gaps around mounting bolts or where the bed liner doesn’t quite meet the truck bed, use a small bead of exterior-grade silicone sealant to fill these. Smooth it out with a gloved finger.
Step 3: Address Side Rail Leaks
Leaks along the side rails are often due to inadequate weatherstripping or uneven surfaces.
- Inspect Existing Weatherstripping: Examine the weatherstripping on the underside of your tonneau cover’s side rails. Is it compressed, torn, or too thin?
- Add or Replace Weatherstripping:
- Under the Rails: If the existing weatherstripping is insufficient, you can add an additional layer of EPDM weatherstripping along the top edge of your truck’s bed rails, directly beneath where the tonneau cover rails sit. Measure and cut the strips to fit precisely.
- On the Cover Rails: Alternatively, you can apply new, thicker EPDM weatherstripping directly to the underside of your tonneau cover’s side rails. Ensure it extends the full length of the rail.
- Check Clamp Pressure: Ensure all clamps holding the tonneau cover rails are tightened evenly and securely. Uneven pressure can create small gaps. Do not overtighten, as this can warp the rails or damage the bed.
- Seal Bed Cap Gaps: If your truck has plastic bed caps that create channels, you might need to apply a thin bead of silicone sealant along the seam where the bed cap meets the metal bed rail, or use thin butyl tape underneath the bed cap itself before installing the tonneau cover.
Step 4: Seal the Tailgate Area
The tailgate is a common entry point for both water and dust. A dedicated tailgate seal kit is usually the best approach.
- Clean the Tailgate: Thoroughly clean and degrease the entire perimeter of your tailgate and the corresponding edges of the truck bed where the seal will make contact.
- Install Tailgate Seal Kit:
- Bottom Seal: Most kits include a long, D-shaped or bulb-shaped seal for the bottom edge of the tailgate. Apply this seal to the bottom edge of your tailgate, ensuring it compresses against the truck bed floor when closed.
- Side Seals: Apply shorter seals to the vertical sides of the tailgate, where it meets the truck’s body. These seals typically go on the inside edge of the tailgate, or on the truck body itself, depending on the kit’s design.
- Corner Seals: Some kits include small corner pieces to bridge the gaps where the tailgate meets the bed rails at the top corners.
- Trim Excess: Use a utility knife or scissors to trim any excess seal material for a clean finish.
- Check for Compression: Close the tailgate and visually inspect the seals. They should be compressed but not overly flattened. If there are still visible gaps, you might need to adjust the seal placement or add a second, thinner layer in specific spots.
Step 5: Inspect and Optimize Drainage Systems (if applicable)
For hard folding or retractable covers with drain tubes, proper drainage is essential.
- Clear Drain Tubes: Ensure the drain tubes are free of any debris. Use compressed air or a thin wire to clear blockages.
- Proper Routing: Check that the drain tubes are routed downwards, without kinks or high points, and exit the truck bed through the designated drain holes (usually in the front corners of the bed) or stake pockets.
- Secure Connections: Verify that the drain tubes are securely connected to the tonneau cover’s drainage channels and to the exit points. Use hose clamps if necessary to prevent disconnections.
- Test Drainage: Pour a small amount of water into the tonneau cover’s drainage channels (usually located at the front corners) and observe if it drains freely and completely out of the truck bed.
Step 6: Final Inspection and Water Test
Once all seals are in place, it’s time to test your work.
- Visual Inspection: Walk around your truck bed and visually inspect all newly installed seals. Look for any areas where the seal isn’t making full contact or where gaps are still visible.
- Water Test:
- Hose Test: Use a garden hose with a spray nozzle. Start by spraying water gently over the entire tonneau cover, focusing on the seams, edges, bulkhead, and tailgate. Gradually increase the water pressure.
- Inside Inspection: Have someone sit inside the truck bed with a flashlight (or use a work light) to identify any drips or streams of water. Pay close attention to the areas you just sealed.
- Identify Leaks: Mark any leak points with a piece of tape or a marker.
- Address Remaining Leaks: For any identified leaks, apply additional silicone sealant, adjust weatherstripping, or add another layer of seal as needed. Allow silicone to cure fully before retesting.
By following these steps meticulously, you’ll significantly improve the weather resistance of your tonneau cover and protect your truck bed contents.
Advanced Sealing Techniques and Considerations
While the basic steps cover most common leak points, some situations might require more advanced techniques or specific considerations. I’ve encountered various challenges over the years, and these tips can help you tackle those trickier scenarios.
Dealing with Uneven Bed Rails and Bed Caps
Many trucks, especially older models or those with aftermarket bed liners, can have bed rails that aren’t perfectly flat or uniform. Plastic bed caps are also notorious for creating small channels.
- Layering Weatherstripping: For significant variations, you might need to layer thinner strips of EPDM weatherstripping. Start with a wider, thinner strip, and then add a narrower, thicker strip on top in areas where the gap is larger. This creates a custom-fit seal.
- Butyl Tape Under Bed Caps: If water is seeping under your plastic bed caps and then into the bed, carefully lift the bed caps (if possible) and apply a continuous bead of butyl tape along the top edge of the metal bed rail before reinstalling the caps. This creates a permanent, waterproof barrier.
- Silicone Bed Cap Seams: For bed caps that are permanently attached or difficult to remove, a thin bead of exterior-grade silicone sealant along the seam where the plastic bed cap meets the metal bed rail can prevent water from entering. Ensure the surface is impeccably clean before application.
Sealing Around Toolboxes or Bed Extenders
If you have a toolbox that sits inside the truck bed or a bed extender, these can introduce new challenges for sealing your tonneau cover.
- Toolbox-to-Cover Gap: For crossovers or toolboxes that sit flush with the bed rails, the tonneau cover often butts up against the toolbox. You’ll need to apply a robust EPDM weatherstripping seal to the top edge of the toolbox, ensuring it compresses tightly against the tonneau cover’s front rail.
- Toolbox-to-Bed Gap: Don’t forget to seal the toolbox itself. Many toolboxes aren’t perfectly waterproof. Use silicone sealant around the mounting points and any seams where the toolbox meets the truck bed.
- Custom Cutouts: If your tonneau cover requires custom cutouts around a toolbox or other accessories, use silicone sealant or small pieces of EPDM weatherstripping to seal the edges of these cutouts.
Addressing Leaks on Hard Folding or Retractable Covers
These covers have unique leak points due to their panel design and mechanisms.
- Panel Seams: On hard folding covers, the seams between the panels are sealed with rubber gaskets. Over time, these can wear out, crack, or become dislodged. Inspect them closely. If damaged, you might need to replace the entire gasket or use a flexible, UV-resistant silicone sealant to repair small cracks.
- Hinge Points: The hinges on folding covers can sometimes allow water to seep through. Apply a small amount of silicone sealant around the hinge pins or where the hinge mechanism meets the cover panels, being careful not to impede the folding action.
- Canister Leaks (Retractable Covers): For retractable covers, the canister that houses the rolled-up cover can sometimes leak. Ensure the canister is properly seated and sealed against the bulkhead. Check for any gaps around the canister’s mounting points and apply silicone sealant if necessary. Also, verify that the canister’s drain tubes are clear and properly routed.
Enhancing Dust Protection
While water sealing often helps with dust, dust particles are much finer and can find their way through even smaller gaps. For maximum dust protection, you need an even more meticulous approach.
- Comprehensive Tailgate Seal: A high-quality tailgate seal kit is paramount for dust. Ensure it seals all three sides (bottom and two vertical sides) of the tailgate completely.
- Butyl Tape for Bed Caps: As mentioned, using butyl tape under bed caps is excellent for preventing dust from entering through those channels.
- Silicone All Small Gaps: Be extra diligent with silicone sealant. Fill every tiny gap you can find, especially where the bed liner meets the truck bed, around tie-down points, and any factory holes.
- Check for Airflow: Dust often enters where air can flow. If you can feel a draft inside your truck bed with the cover closed, that’s a potential dust entry point.
Maintenance and Longevity of Seals
Even the best seals won’t last forever without some care.
- Regular Cleaning: Periodically clean your seals with mild soap and water to remove dirt and grime that can degrade the material.
- UV Protectant: For exposed rubber seals, consider applying a UV protectant specifically designed for rubber. This helps prevent cracking and hardening caused by sun exposure.
- Inspect Annually: Make it a habit to inspect all your seals at least once a year, or after extreme weather conditions. Look for signs of wear, cracking, or loss of adhesion. Replace any compromised seals promptly.
- Avoid Harsh Chemicals: Do not use petroleum-based cleaners or solvents on rubber seals, as these can cause them to degrade rapidly.
By implementing these advanced techniques and maintaining your seals, you can achieve a superior and long-lasting seal for your tonneau cover, providing ultimate protection for your cargo.
Troubleshooting Common Sealing Issues
Even after a thorough sealing process, you might still encounter a persistent drip or a stubborn dust trail. Don’t get discouraged; troubleshooting is a normal part of the process. I’ll outline some common issues and how to approach them.
Persistent Leaks After Initial Sealing
If you’ve gone through the steps and still find water in your bed, it’s time for a more focused investigation.
- Re-test Systematically: Don’t just spray water randomly. Start by spraying only the bulkhead area, then check for leaks. If none, move to one side rail, then the other, then the tailgate. This helps isolate the problem area.
- Use a “Smoke Test” (Carefully): For very subtle leaks, some people use a smoke machine (like those used for automotive leak detection) inside the truck bed with the cover closed. The smoke will escape through even tiny gaps, making them visible. Exercise extreme caution, ensuring adequate ventilation and no flammable materials are present. This is an advanced technique and should only be attempted by experienced individuals.
- Look for Water Trails: Water often leaves a trail. Look for streaks, drips, or discoloration on the inside of your truck bed, which can point directly to the source of the leak.
- Check for “Wicking”: Sometimes, water doesn’t drip directly but “wicks” along a surface before dripping elsewhere. Trace the path of the water back to its origin.
- Re-evaluate Seal Compression: Are your seals being adequately compressed? If a seal looks flattened or squished, it might be too thick. If it looks barely touched, it might be too thin or not positioned correctly.
Adhesive Failure or Peeling Seals
If your newly applied weatherstripping starts to peel off, it’s almost always an adhesion issue.
- Surface Prep is Key: Revisit Step 1. Was the surface perfectly clean and dry? Any residual wax, grease, or dirt will cause adhesive failure. Use more rubbing alcohol and clean rags.
- Temperature During Application: Most adhesive seals require application in a certain temperature range (typically above 50°F or 10°C). If applied in cold weather, the adhesive might not cure properly.
- Curing Time: Did you allow enough time for the adhesive to bond before exposing it to stress or water? Some adhesives need 24-48 hours to fully cure.
- Quality of Adhesive: Not all adhesive backings are created equal. If you used a generic weatherstripping, the adhesive might be weak. Consider using a brand known for strong automotive-grade adhesives. You can sometimes supplement with a thin bead of silicone sealant along the edges of the weatherstripping for extra security.
- Wrong Material for the Job: Is the seal material too stiff for the curve or gap? A more flexible material might be needed.
Drainage System Backups or Clogs
Even after clearing, drain tubes can clog again or have underlying issues.
- Regular Inspection: Make it a habit to check your drain tubes periodically, especially after parking under trees or in dusty environments.
- Screening Drain Openings: Consider adding a small, fine mesh screen over the drain tube openings on the tonneau cover side to prevent larger debris from entering.
- Proper Slope: Ensure the drain tubes have a continuous downward slope. If there’s any sag or upward bend, water will collect. You might need to re-route or secure them better with zip ties.
- Check Exit Points: Are the exit points for the drain tubes clear? Sometimes they can get blocked by mud, debris, or even other truck accessories.
Gaps Around the Tailgate Hinge or Latch
While tailgate seal kits cover most areas, the hinge and latch mechanisms can sometimes be overlooked.
- Silicone Around Hinges: For small gaps around the tailgate hinges, a careful application of clear or black silicone sealant can help. Apply it sparingly and ensure it doesn’t interfere with the hinge’s movement.
- Latch Mechanism: Inspect the latch mechanism. If water is entering here, it’s often due to a poor seal where the plastic trim meets the metal tailgate. A thin bead of silicone can seal these seams.
- Adjusting Tailgate: In some cases, the tailgate itself might be slightly misaligned, creating larger-than-normal gaps. Consult your truck’s owner’s manual or a body shop for instructions on how to adjust tailgate alignment, if possible.
Noise or Vibrations from the Cover
While not a leak, noise can indicate an improper seal or loose components.
- Check All Clamps: Ensure all clamps holding the tonneau cover rails are tight and secure. Loose clamps can cause rattling.
- Inspect Weatherstripping: If weatherstripping is too thin or missing in certain areas, it can allow the cover to vibrate against the bed rails, causing noise. Add or replace weatherstripping as needed.
- Panel Alignment (Folding Covers): For folding covers, ensure the panels are properly aligned and latched when closed. Misaligned panels can create gaps and noise.
Troubleshooting requires a methodical approach. Don’t try to fix everything at once. Address one potential issue, re-test, and then move on. With persistence, you can identify and resolve even the most stubborn leaks.
Maintaining Your Tonneau Cover Seal for Long-Term Protection
Installing a proper seal is a significant step, but maintaining it is equally important for long-term protection. Neglecting your seals can lead to their premature degradation, bringing back the very problems you worked so hard to eliminate. I always advise my clients that maintenance is not an option, but a necessity.
Regular Cleaning and Inspection
This is the simplest yet most effective maintenance practice.
- Weekly or Bi-Weekly Wipe Down: Use a mild automotive soap and water solution to clean the exterior of your tonneau cover and the visible parts of the seals. This removes dirt, dust, and environmental contaminants that can break down rubber and adhesives over time.
- Monthly Deep Clean of Seals: Pay special attention to the rubber and foam seals. Use a soft brush or cloth to gently clean them. Rinse thoroughly to remove all soap residue.
- Visual Inspection: During cleaning, take a few minutes to visually inspect all seals. Look for:
- Cracking or Dry Rot: Especially on rubber seals exposed to the sun.
- Hardening: Rubber seals should remain pliable. If they feel stiff, they might be losing their effectiveness.
- Tears or Abrasions: From cargo rubbing against them or general wear and tear.
- Loss of Adhesion: Check if any part of the weatherstripping is peeling away from the truck bed or tonneau cover.
- Debris in Channels: Clear any leaves, twigs, or dirt from the tonneau cover’s drainage channels and around the edges.
- Check Drain Tubes: If your cover has drain tubes, ensure they are clear of obstructions and properly routed. Pour a small amount of water into the channels to confirm free flow.
Protecting Seals from Environmental Damage
The elements are the biggest enemy of your tonneau cover seals.
- UV Protectant for Rubber: Sun exposure is a major cause of rubber degradation. Apply a UV protectant specifically designed for automotive rubber and vinyl to all exposed rubber seals every 3-6 months. Products like 303 Aerospace Protectant are excellent for this, as they don’t leave a greasy residue and actively block UV rays. This helps prevent drying, cracking, and fading.
- Avoid Harsh Chemicals: When washing your truck, be mindful of the chemicals you use. Many strong degreasers or tire shines can be detrimental to rubber and plastic seals. Stick to pH-neutral car wash soaps.
- Winter Care: In colder climates, ice and snow can stick to seals, potentially tearing them when the cover is opened or closed. During winter, consider applying a silicone-based lubricant (like silicone spray) to the seals. This helps prevent ice adhesion and keeps the rubber pliable in freezing temperatures.
Addressing Minor Wear and Tear Promptly
Small issues can quickly escalate if left unaddressed.
- Re-adhere Peeling Sections: If a small section of weatherstripping starts to peel, you can often re-adhere it using a strong, flexible adhesive like a rubber cement or a small bead of RTV silicone. Clean the surface thoroughly before re-application.
- Patch Small Tears: For minor tears in rubber seals, a specialized rubber repair adhesive or even a small dab of silicone sealant can temporarily patch the area. For larger tears, replacement of the section or the entire seal might be necessary.
- Tighten Loose Clamps: Periodically check the tightness of all tonneau cover clamps. Vibrations from driving can cause them to loosen over time, compromising the seal and potentially leading to noise.
Proper Operation of the Tonneau Cover
How you use your cover also impacts seal longevity.
- Gentle Opening/Closing: Avoid slamming or forcing your tonneau cover open or closed. This can put undue stress on the seals and hinges.
- Clear Debris Before Closing: Before closing a folding or rolling cover, ensure there’s no debris (leaves, small rocks) on the bed rails or seals that could get pinched and damage the seal.
- Avoid Overloading: While not directly related to seals, overloading your truck bed in a way that puts excessive pressure on the tonneau cover can indirectly affect the integrity of the seals over time.
By incorporating these maintenance practices into your routine, you can significantly extend the life and effectiveness of your tonneau cover’s seal, ensuring your cargo remains protected for years to come.
Conclusion
A properly sealed tonneau cover is more than just a convenience; it’s an essential component for protecting your truck bed and its contents from the elements and road debris. While the process of sealing might seem daunting at first, by systematically identifying potential leak points, selecting the right materials, and meticulously following the installation and maintenance steps, you can achieve a highly effective and long-lasting seal.
I’ve guided you through understanding common leak areas, gathering the necessary tools and materials, a detailed step-by-step sealing process, advanced techniques for tricky situations, and crucial troubleshooting and maintenance tips. Remember that patience and attention to detail are your best allies in this endeavor. Regular inspection and proactive care will ensure your seals remain robust, providing peace of mind on every journey. By taking the time to correctly how to seal tonneau cover, you’re investing in the longevity of your truck and the safety of your cargo.