How to Test TPMS Sensor: A Beginner’s Guide
A TPMS warning light can mean a tire is losing air, a sensor battery is weak, or the vehicle has not learned a replacement sensor. Because those problems look similar from the driver’s seat, replacing parts immediately is often an expensive guess. A few careful checks can usually narrow the cause before any tire is removed.
To test a TPMS sensor, first identify whether the vehicle uses direct or indirect monitoring. A direct system has a pressure sensor inside each wheel and can usually be checked with a TPMS scan tool; an indirect system estimates pressure through wheel-speed data and does not contain a pressure sensor to test at the valve.
This guide explains how to test tpms sensor operation safely, compare the reading with an accurate tire gauge, recognize a dead or incompatible sensor, and complete the vehicle’s relearn process when needed. You will also learn when a warning light points to low pressure rather than an electronic fault—and when the safest choice is to stop and get professional help.
At a glance
- Check actual tire pressure before diagnosing electronics.
- A TPMS scan tool can identify sensor communication, ID, temperature, and battery information on many direct systems.
- A successful test still requires the warning light to clear after the correct relearn or drive procedure.
How to test tpms sensor operation safely
The most reliable beginner method combines three checks: measure the tire pressure, activate and read each direct sensor with a compatible tool, and verify that the vehicle recognizes the sensors afterward. The exact display names and relearn process vary by make, model, model year, and sensor type, so use the vehicle owner’s manual or repair information for the required pressure and reset procedure.
Tools you will need
- A reliable tire-pressure gauge, used to compare actual inflation with the vehicle’s specified pressure
- A TPMS scan or activation tool compatible with the vehicle and sensor frequency
- Optional: an air compressor or approved air source for correcting pressure
- Optional: the vehicle owner’s manual, especially for the sensor relearn procedure

Step 1 Confirm the vehicle’s TPMS type and specifications
Park on a level surface, switch off the engine, and find the tire-pressure placard. It is commonly located on the driver’s doorjamb, door edge, or inside the fuel-door area. Record the specified cold pressure for the front and rear tires; do not use the maximum pressure molded into the tire sidewall as the normal target.
Next, determine whether the vehicle has a direct TPMS or an indirect system. Direct TPMS uses a pressure sensor at each wheel, usually integrated with the valve stem. Indirect TPMS has no pressure sensor in the wheel; it compares wheel rotation or vibration through the anti-lock brake system to detect a tire that appears smaller because it has lost air.
The owner’s manual may identify the system, and a TPMS scan tool may show whether it can communicate with individual wheel sensors. A tire shop or service department can also confirm the system type from the vehicle identification information. If the system is indirect, skip the sensor-activation test and follow the vehicle’s pressure check and calibration instructions instead.
Step 2 Inspect the tires and measure cold pressure
Look over all four tires, and include the spare if the vehicle has a full-size spare that participates in TPMS. Check for a visibly low tire, a nail, a damaged sidewall, a bent wheel, a leaking valve stem, or a missing valve-cap seal. Do not continue driving on a tire that is visibly damaged or rapidly losing air.
Remove each valve cap and press the tire gauge squarely onto the valve stem. Compare the reading with the placard, then add or release air as appropriate. The most meaningful comparison is made when the tires are cold—before driving, or after the vehicle has been parked long enough for the tires to cool—because driving raises pressure temporarily.
Write down the measured pressure at each position. If one tire is substantially lower than the others, correct the pressure and inspect for a leak before blaming the sensor. A TPMS sensor reports pressure; it does not create pressure or prevent a puncture.
Important
Never remove a tire-mounted TPMS sensor or break the tire bead with ordinary hand tools unless you know where the sensor is positioned and have the proper equipment. The sensor can be damaged during tire service, and a damaged valve or tire can create a serious loss-of-air hazard.
Step 3 Prepare and identify the TPMS scan tool
Turn on the scan tool and select the vehicle by make, model, and year. Confirm that the tool supports the vehicle’s TPMS frequency and sensor type. Many vehicles use sensors operating around 315 MHz or 433/434 MHz, but frequency alone does not establish compatibility; protocol, sensor ID format, valve design, and vehicle software also matter.
If the tool uses an automatic vehicle-identification function, verify the result rather than accepting it blindly. A wrong application can produce missing or misleading data. Read the tool’s instructions for whether it needs to be held beside the valve stem, pointed at the tire sidewall, or connected to the vehicle’s diagnostic connector.
Keep the ignition in the position specified by the tool. On some vehicles the engine remains off while the ignition is switched on; on others, the tool communicates through the vehicle’s OBD-II connector after the sensor is activated. Do not press the brake pedal or start the engine unless the instructions call for it.
Step 4 Activate and read each direct TPMS sensor
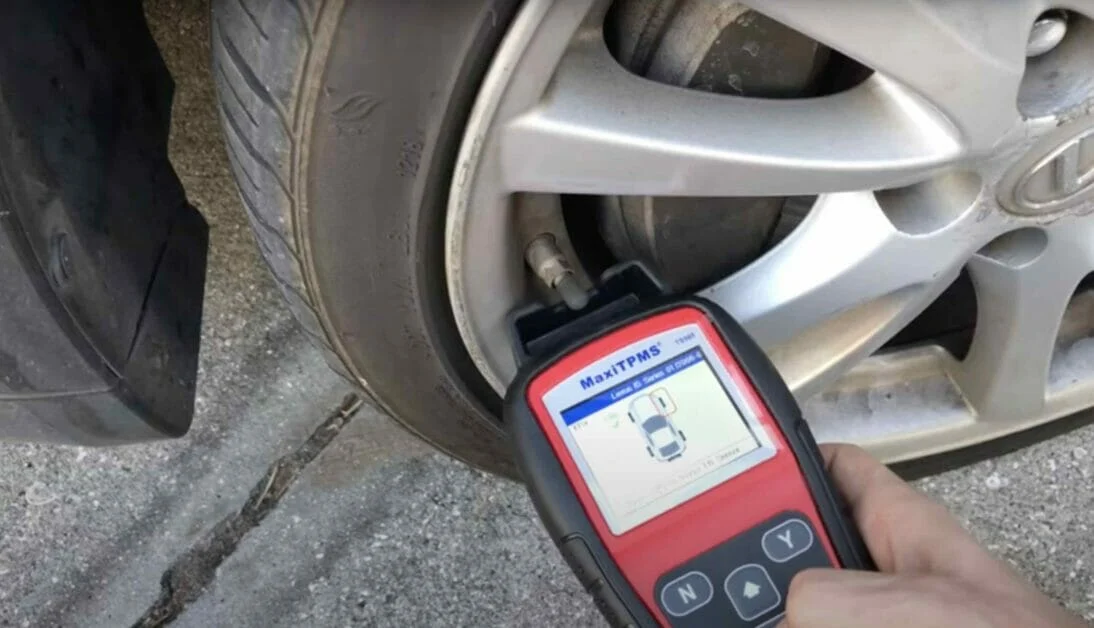
Starting at the left front wheel, place the TPMS tool near the valve stem and activate the sensor. Follow the tool’s prescribed button or trigger action. A working sensor commonly responds with its unique sensor ID, pressure, internal temperature, and sometimes battery condition or signal strength.
Record the result for each wheel in a simple pattern: left front, right front, right rear, and left rear. If the vehicle monitors a spare, test that wheel as well. The exact order is not universal, but keeping a consistent location record prevents a sensor ID from being assigned to the wrong corner.
Compare the pressure shown by the tool with the tire gauge reading. They may not match exactly because of gauge accuracy, temperature, display rounding, and the time between measurements. The important signs are that the sensor responds, its pressure is reasonably close to the measured pressure, and the result is associated with the correct wheel.
A sensor that responds with a plausible pressure is communicating at that moment. That does not prove the sensor will remain reliable, that the battery has years of life left, or that the vehicle control module has learned the sensor ID. Those questions are addressed in the next checks.
Step 5 Check the sensor ID, battery information, and response quality
Review the scan tool’s detailed result for each sensor. Look for an ID that is present and stable, pressure that is not obviously impossible, a temperature that is reasonable for the tire’s conditions, and a battery status that is not marked weak, low, or failed. Some sensors do not transmit a battery percentage, so a missing battery reading is not automatically a fault.
Activate a questionable sensor again while holding the tool in the correct position. If it responds only intermittently, requires repeated attempts, or shows a missing ID, the sensor battery may be depleted, the sensor may be damaged, or the tool may not support that sensor. A sensor mounted on the wrong frequency or with an incompatible protocol can also fail to respond.
Do not interpret a pressure value of zero as proof that the sensor is dead until you compare it with the tire gauge and repeat the activation. The tire could actually be empty, the tool could have read stale data, or the sensor could be transmitting incomplete information.
Check your result
A useful intermediate result is four identified wheel positions with plausible pressure readings that roughly agree with the gauge. If one position is absent or clearly incorrect, concentrate the diagnosis on that wheel, its sensor, the valve area, and the sensor’s compatibility.
Step 6 Use the vehicle connection when the tool supports it
Some TPMS tools can connect to the vehicle through the OBD-II diagnostic connector and read or write sensor IDs in the TPMS control module. If your tool specifically supports this function, connect it exactly as instructed and first read the stored sensor IDs before changing anything.
Compare the stored IDs with the IDs obtained at the wheels. A mismatch can occur after a sensor replacement, wheel rotation, module replacement, or incomplete relearn. Do not overwrite the module simply because the warning light is on; record the existing information and confirm the correct procedure for that vehicle.
If the tool can only activate sensors and cannot access the vehicle module, that is still useful. It confirms whether each sensor is transmitting, but it does not confirm that the vehicle has accepted the sensor ID or assigned it to the correct wheel. A useful way to approach how to test tpms sensor is to check your progress after each stage.
Step 7 Perform the required relearn or calibration
After replacing a sensor, rotating wheels, or correcting a lost sensor ID, complete the vehicle-specific relearn procedure. Common methods include an automatic drive relearn, a manual process using steering-wheel or dashboard controls, and a stationary procedure that requires activating each sensor in a specified order. Some vehicles require a scan tool to write IDs through the diagnostic connector.
Use the owner’s manual or service information for the exact method. An automatic system may need a short drive above a specified speed, while a manual system may enter a learn mode and sound the horn or display a message as each sensor is accepted. Do not assume that pressing a generic “reset” button teaches new sensors; on some vehicles it only resets the reference pressure for an indirect system.
When the procedure is complete, switch the ignition off and back on if instructed. The tool, dashboard message, horn, or instrument display should indicate acceptance. If the vehicle does not show a completion message, continue to the verification step rather than assuming success.
Step 8 Verify the warning light and compare the final readings
Start the vehicle and observe the TPMS indicator. A light that turns off after the self-check is a good sign. If the light remains on, recheck tire pressure first; if it flashes for roughly a minute and then stays on, that pattern commonly indicates a system fault rather than simple low pressure, although the exact meaning varies by vehicle.
Use the TPMS tool again if available and confirm that every required sensor responds. Compare the displayed pressures with the cold tire pressures you recorded earlier, then make any final pressure adjustment. If the vehicle requires a drive cycle, complete it on a safe route where you can monitor the dashboard without distraction.
The test is complete when the tires are correctly inflated, the expected wheel sensors communicate, the sensor IDs are accepted or properly relearned, and the warning light stays off after the vehicle’s self-check or drive procedure. If any one of those conditions is missing, the result is not yet conclusive.
What the test results mean
A TPMS test separates an air-pressure problem from a communication or registration problem. The table below gives a practical starting point, but the vehicle’s fault codes and service information take priority because manufacturers use different warning-light patterns and sensor strategies.
| Observed result | Likely direction | Next check |
|---|---|---|
| One tire is low and its sensor responds | Inflation problem or air leak | Set cold pressure and inspect the tire, valve, and wheel for leakage. |
| One sensor does not respond | Dead battery, damage, wrong frequency, or tool incompatibility | Repeat activation and confirm the sensor application and hardware. |
| All sensors respond, but the warning remains | Relearn, ID assignment, pressure threshold, or vehicle-side fault | Read stored IDs and complete the correct relearn procedure. |
| Light flashes, then stays on | TPMS system fault is likely | Scan the vehicle module or seek qualified diagnosis. |
Why a tire gauge and scan tool can disagree
A tire gauge measures air pressure at the valve at that moment. The sensor may have transmitted a reading earlier, may round the number on its display, or may be measuring a different temperature. A small difference is normal; a large or persistent difference deserves another measurement with a known-good gauge and a sensor recheck.
Why a sensor can test correctly but still trigger a warning
Communication is only one part of the system. The vehicle must also recognize the sensor ID, know its wheel position when required, receive a pressure above its warning threshold, and have no fault in the TPMS receiver, antenna, wiring, or control module.
For that reason, how to test tpms sensor should not be treated as a single button press. A successful activation confirms transmission, while a successful relearn and road verification confirm that the vehicle can use the information.
Troubleshooting an unclear or failed TPMS test
Start with the simplest explanation and change only one thing at a time. Confirm the vehicle application in the tool, check the tool battery, and repeat the test from the correct position before deciding that a sensor must be replaced.

The tool cannot find any sensors
Check whether the tool is compatible with the vehicle and sensor type. A low tool battery, incorrect vehicle selection, excessive distance from the valve, heavy wheel construction, or a sensor that requires a special trigger method can prevent activation.
If all four sensors stopped responding at once, suspect the test setup or vehicle-side communication before assuming that four sensor batteries failed simultaneously. A TPMS module, receiver, fuse, or antenna problem may need professional diagnosis.
Only one wheel fails the test
Repeat the activation with the tool held beside that wheel’s valve stem, then compare it with a known-working wheel. Inspect the valve area for corrosion, physical damage, or a recently installed replacement sensor. If the other sensors respond and the questionable sensor remains silent, replacement may be necessary.
Some sensors have replaceable valve hardware but a nonreplaceable internal battery. Do not attempt to open a sealed sensor or install a battery that the manufacturer does not specify.
The sensor responds but the vehicle will not learn it
Confirm that the replacement sensor is programmed for the vehicle, not merely labeled as a universal sensor. Check whether the vehicle requires an exact sensor ID, a specific wheel order, a stationary learn mode, or an OBD-II write procedure.
Also verify that the sensor is installed at the wheel position the vehicle expects. A sensor that was moved during a tire rotation may still transmit correctly but be assigned to a different corner until a relearn is performed.
The warning returns after pressure is corrected
Measure all tires again when cold, including the spare if applicable. Look for a slow puncture or valve leak that is lowering one tire between checks. If pressures remain correct and the light returns, read TPMS fault codes rather than repeatedly resetting the system.
Helpful tip
Keep a written record of the sensor ID, wheel position, pressure, and test result. That small record makes a later tire rotation, sensor replacement, or shop diagnosis much easier.
When to stop and seek qualified help
Stop the diagnosis if a tire has sidewall damage, a bulge, exposed cord, a rapidly falling pressure, or an uncertain repair condition. Have the tire inspected before driving farther. Seek professional TPMS service when a tire must be dismounted, the wheel or valve is damaged, the vehicle module will not communicate, or the correct relearn procedure cannot be confirmed.
Beginner questions about testing TPMS sensors
These answers cover the common points that cause confusion when a warning light appears after inflation, tire work, or a sensor replacement.
Can I test a TPMS sensor without a scan tool?
You can check tire pressure with a gauge and observe whether the warning changes after proper inflation, but you generally cannot confirm direct-sensor transmission without a TPMS activation or scan tool. A tire shop can perform that electronic test if you do not own a compatible tool.
Does a TPMS sensor measure tread depth?
No. A direct TPMS sensor normally reports pressure and often temperature, along with identification data. Tread depth, tire wear, and physical damage require separate inspection.
How long do TPMS sensor batteries last?
Battery life varies with sensor design, use, temperature, and transmission frequency. Many sensors use sealed batteries, so a failed battery usually means replacing the complete sensor rather than installing a new battery.
Will adding air reset the TPMS light?
It may, but not always immediately. After setting every tire to the specified cold pressure, some vehicles clear the light after driving, while others require a reset or relearn. If the light flashes or remains on, an electronic fault or registration issue may be present.
Can I use any universal TPMS sensor?
No. A universal sensor must be correctly programmed and compatible with the vehicle’s frequency, communication protocol, valve configuration, and relearn requirements. A sensor that fits the wheel physically may still fail electronically.
Should I replace all four sensors when one fails?
Not automatically. Replace the failed or damaged sensor when the other sensors test correctly, but consider the age and battery history of the remaining sensors. A qualified technician can explain whether replacing them together is practical during tire service.
Confirm the result before replacing parts
The safest way to test tpms sensor operation is to begin with real tire pressure, identify the vehicle’s TPMS type, activate each direct sensor with a compatible tool, and finish with the correct relearn and verification procedure. A responding sensor is encouraging, but the warning light must also clear and the vehicle must accept the sensor data.
If one tire is low, investigate the tire or valve before condemning the electronics. If a sensor will not respond, the tool cannot communicate with the module, or a tire is unsafe to drive on, stop and use qualified tire or TPMS service rather than guessing. Record your readings and sensor IDs so the next diagnosis starts with useful information.
For a reliable result, approach how to test tpms sensor as a sequence of manageable actions and checks.