How to Test TPMS Sensor Battery Safely
A TPMS warning light does not always mean the sensor battery has failed. The light may appear because a tire is underinflated, a sensor is not communicating, a sensor was damaged during tire service, or the vehicle needs a relearn. Because most tire-pressure sensors use a sealed battery, testing them is different from testing a household battery with a multimeter.
The most practical answer to how to test tpms sensor battery is to use a compatible TPMS diagnostic tool. The tool activates each sensor, reads its identification and pressure data, and may report a low-battery condition or signal-strength problem. A sensor that does not respond can have a dead battery, but nonresponse alone does not prove that diagnosis.
This guide explains how to identify the type of system on the vehicle, check tire pressure first, activate each sensor safely, interpret the readings, and verify the repair. It also covers what you can and cannot learn with a multimeter, when a sensor should be replaced, and when the safest choice is to stop and have a tire professional remove the tire.
At a glance
- Check and correct tire pressure before judging a sensor battery.
- A TPMS tool is the safest reliable way to check sensor communication and battery-related status.
- Do not puncture, pry open, or heat a sealed sensor battery inside a tire.
How to test tpms sensor battery safely
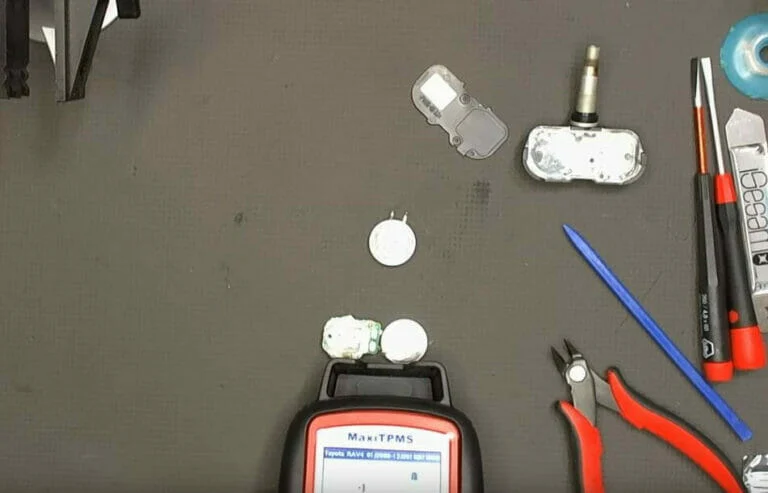
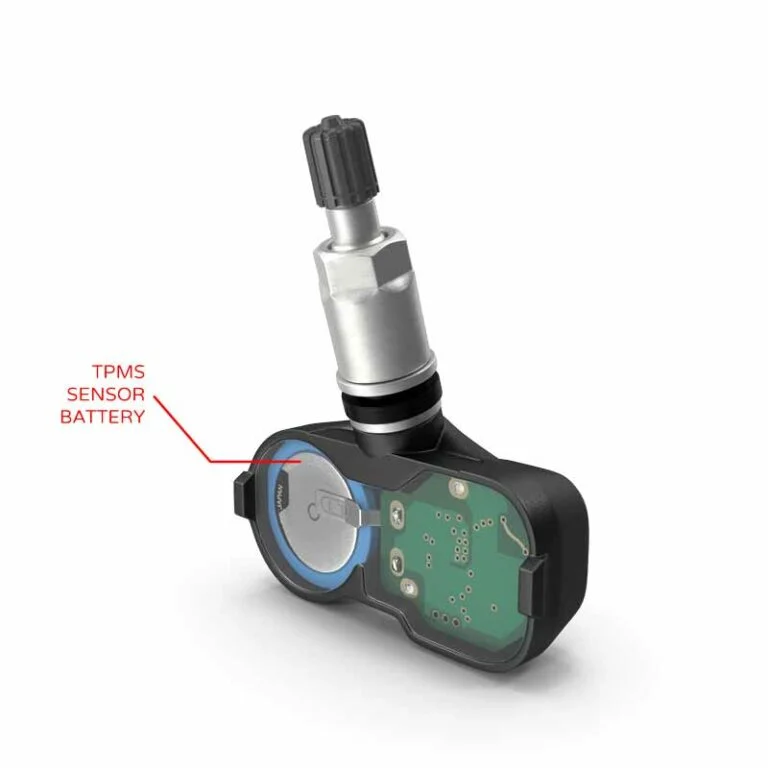
Most vehicles with direct TPMS have a small electronic sensor inside each wheel, commonly attached to the valve stem. Its sealed battery powers a radio transmitter that sends pressure and temperature information to the vehicle. A TPMS tool can usually wake the sensor and read its data without removing the tire.
Before testing, confirm whether the vehicle has direct or indirect TPMS. Direct systems use wheel-mounted sensors and can be checked with a sensor activation tool. Indirect systems estimate pressure through wheel-speed sensors and do not contain a separate tire-pressure sensor battery to test.
Tools you will need
- A TPMS scan or activation tool compatible with the vehicle and sensor frequency
- A reliable tire-pressure gauge for comparing actual pressure with the vehicle’s specified pressure
- Vehicle owner’s manual or the tire-information label for the correct cold inflation pressure
- Optional: vehicle diagnostic scanner that can read TPMS fault codes and sensor data
Step 1 Identify the TPMS design and prepare the vehicle
Look at the vehicle’s owner’s manual or information display for clues about the system. A direct system usually displays individual tire pressures or identifies a particular tire when a fault occurs. An indirect system typically requires a pressure reset or calibration after inflation and may not show individual pressure readings.
Park on a level surface away from moving traffic. Set the parking brake, switch off the engine unless the tool instructions require the ignition on, and keep the tool, gauge, and vehicle manual nearby. Do not begin by removing a tire or loosening a valve core.
Check the tool’s vehicle coverage and operating instructions. TPMS sensors may use different radio frequencies and communication protocols, so a tool made for a different market or vehicle may fail to activate a healthy sensor.
Important
Never test a sensor by drilling into its housing, cutting open its battery, applying external power, or heating it. The battery is usually sealed inside the sensor, and tire removal or sensor disassembly should be handled by a qualified tire technician.
Step 2 Check and record the actual tire pressures
Measure all tires when they are cold, meaning before driving or after the vehicle has been parked long enough for the tires to cool. Compare each reading with the pressure listed on the driver’s door-jamb label, not the maximum pressure molded into the tire sidewall.
Adjust any low tire to the specified pressure and inspect the tire for an obvious puncture, damaged valve stem, or visibly unusual shape. A low-pressure warning caused by a real leak will not be fixed by replacing a sensor battery.
Record which wheel is in each position: left front, right front, left rear, and right rear. This makes it easier to match the TPMS tool’s reading to the correct sensor, especially if the vehicle has recently had tires rotated.
If the warning light is flashing for about a minute after startup and then stays on, the vehicle is indicating a system fault rather than simply low pressure. Low pressure can still exist, but a flashing light makes sensor communication, programming, or a receiver problem more likely.
Step 3 Put the TPMS tool into sensor-test mode
Turn on the TPMS tool and select the vehicle’s year, make, model, and system when prompted. Some tools require a vehicle identification number or sensor type. Choose the function labeled something like “test sensor,” “activate sensor,” or “read TPMS.”
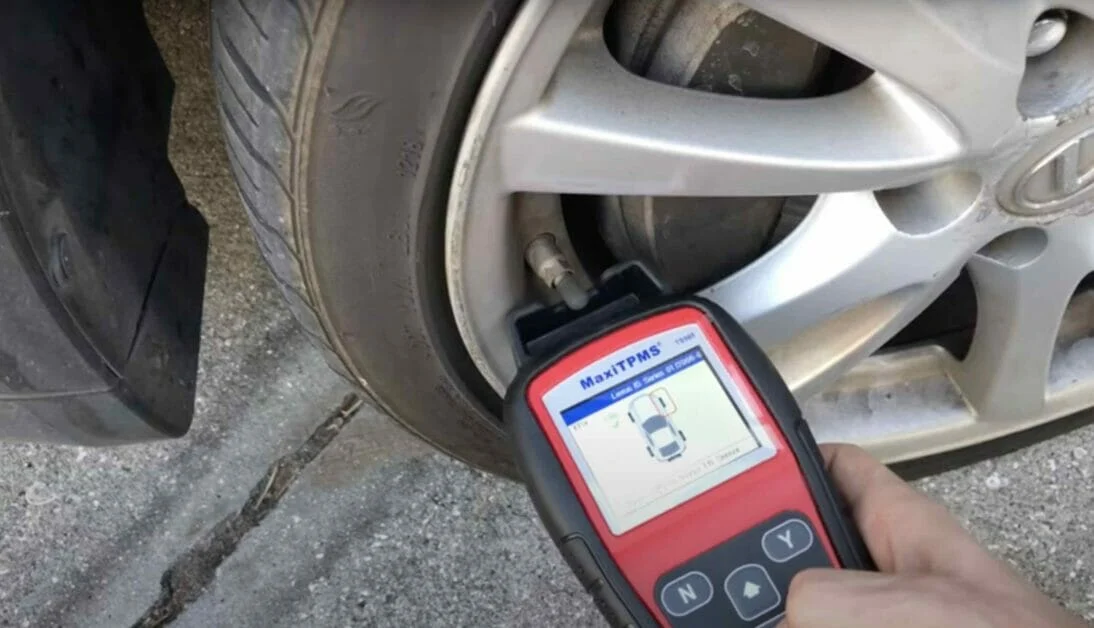
Follow the tool’s stated position for the sensor. Many tools are held against the tire sidewall close to the valve stem, while others can activate the sensor from near the valve. The tool’s placement matters because its radio signal must reach the sensor reliably.
Keep the tool away from other wheels during the first test. Testing near the wrong wheel can produce an unclear result, and some vehicles use sensors that transmit at different frequencies or respond only to a specific activation command.
Step 4 Activate and read each sensor in sequence
Start at the left-front wheel and activate the sensor according to the tool instructions. Wait for the tool to display a result before moving to the next wheel. Then test the right front, right rear, and left rear, recording the result and the sensor identification number for each location.
A normal response commonly includes the sensor ID, measured tire pressure, temperature, and sometimes a battery or signal-status field. The exact display varies by tool and sensor manufacturer. A response within a few seconds is generally evidence that the sensor can transmit at that moment.
Compare the pressure shown by the tool with your tire gauge reading. Small differences are normal because the measurements may be taken at different times or use different rounding. A major difference suggests that the gauge, tool, tire, or sensor reading needs further investigation.
Notice whether one sensor requires several activation attempts while the others respond immediately. A slow or intermittent response may indicate a weak battery, a sensor positioned differently inside the wheel, interference, or a tool-placement problem. A useful way to approach how to test tpms sensor battery is to check your progress after each stage.
Check your result
A useful first result is four correctly identified sensors with plausible pressures and no low-battery or communication warning. That result makes a completely dead sensor battery unlikely, although it does not predict exactly how much battery life remains.
Step 5 Interpret the battery and communication result
Read the tool’s status message rather than relying only on whether the sensor responded. Depending on the sensor and tool, the result may say “battery good,” “low battery,” “weak signal,” “no response,” or simply show measured data without a battery estimate.
A clear low-battery message is strong evidence that the sensor should be replaced. A sensor that sends data but reports low battery can continue working temporarily, but replacing it during tire service is usually more practical than waiting for a complete failure.
If the tool reports no response, repeat the test with the tool positioned close to the valve stem. Check that the selected vehicle and sensor frequency are correct, then test the same wheel again. If the other three sensors respond normally and one still does not, that wheel deserves further diagnosis.
Do not treat “no response” as automatic proof of a dead battery. The sensor may be damaged, incorrectly programmed, mounted in a different wheel position, shielded by a wheel or tire, or incompatible with the tool. The vehicle’s TPMS receiver or wiring can also be involved.
Step 6 Compare the sensor results with the vehicle’s TPMS data
Start the vehicle or switch the ignition to the position specified by the manual, then check the instrument cluster or information display. Some vehicles show individual pressure readings, while others show only a warning light. If a diagnostic scanner is available, read TPMS fault codes and live sensor information.
Match the sensor IDs from the activation tool with the IDs stored in the vehicle, if the tool or scanner provides that information. A mismatch may occur after a wheel replacement, sensor installation, or tire rotation. It does not necessarily indicate a battery problem.
If the tool reads all sensors but the vehicle does not, the issue may be a required relearn, an incorrect sensor ID, a damaged receiver, or a fault in the vehicle’s TPMS system. Follow the vehicle-specific relearn procedure rather than repeatedly replacing sensors.
Step 7 Decide whether the sensor needs replacement
Replace the sensor when the tool confirms a low battery, when the sensor consistently fails to respond after correct testing, or when the sensor is physically damaged or leaking at the valve stem. A TPMS sensor battery is normally not a serviceable part; the complete sensor is replaced instead.
Have a tire professional remove the tire from the wheel. The sensor is mounted inside the tire, and breaking the bead or using a tire machine incorrectly can damage the sensor, tire, or wheel. Tell the technician about the test result and provide the sensor ID if you recorded it.
When selecting a replacement, match the sensor to the vehicle’s application, frequency, valve style, and programming requirements. Some aftermarket sensors must be cloned from the original sensor or programmed with the vehicle information before installation.
Step 8 Relearn the replacement or confirm the existing sensor
After a sensor is installed, use the vehicle’s required relearn method. Common methods include an automatic drive relearn, a stationary relearn using a TPMS activation tool, or programming the sensor IDs with a diagnostic device. The correct method depends on the vehicle, not just the sensor brand.
Inflate all tires to the specified cold pressure before beginning the relearn. If the vehicle requires a stationary procedure, follow the wheel order and ignition steps exactly. If it requires a drive procedure, use the manual’s instructions and remain alert to traffic rather than watching the display continuously.
A successful relearn usually causes the warning light to go out after the vehicle completes its checks, although some systems require the ignition to be cycled. Use the TPMS tool again afterward when possible and confirm that each sensor reports the correct wheel position and a plausible pressure.
Step 9 Verify the repair and save the diagnostic result
With the vehicle parked safely, compare the tool readings, tire-gauge readings, and dashboard information one final time. The warning light should not return after the vehicle completes its normal self-check. If it remains on, determine whether the display indicates low pressure or a system fault.
Drive only as far as needed for the vehicle’s relearn procedure, and stop if the tire feels unstable, loses pressure, or shows damage. After the procedure, recheck the tires visually and confirm that the valve caps and valve hardware are installed correctly.
Keep a note of the sensor ID, wheel position, fault message, and date of replacement. This record can prevent confusion after a future tire rotation and helps a technician distinguish an old sensor ID from a newly installed one. Understanding how to test tpms sensor battery also means recognizing the limits of the method.
What a TPMS battery test can actually tell you
A TPMS tool tests communication more directly than it tests battery chemistry. When a sensor responds, the tool has shown that the battery can currently power the sensor’s transmitter and electronics. It has not necessarily measured the battery’s remaining capacity or predicted an exact replacement date.
Many original-equipment sensors use a sealed lithium battery designed to last for years, but service life varies with temperature, transmission frequency, driving conditions, and sensor design. A battery can work during one test and fail later, especially if the tool reports a weak or low-battery condition.
Why a multimeter usually is not the right test
A multimeter can measure voltage only if you can safely reach the battery terminals. On most TPMS sensors, the battery is enclosed in a molded housing and connected to the circuit board. Accessing it requires opening or destroying the sensor, which compromises the housing and is not a practical repair.
Even an exposed voltage reading would not provide a complete health check. A battery may show normal voltage with no load but drop when the radio transmitter operates. The sensor’s ability to wake, transmit, and provide consistent data is more useful than an isolated voltage measurement.
If a tire professional has already removed the sensor and the design includes an accessible replaceable battery, follow the manufacturer’s service information. Do not assume that one sensor’s construction applies to another, and do not install a loose battery inside a tire.
Direct and indirect TPMS are not tested the same way
Direct TPMS uses a pressure sensor mounted in each wheel. The sensor normally contains a pressure transducer, temperature sensor, radio transmitter, and battery. A TPMS activation tool can often communicate with these sensors from outside the tire.
Indirect TPMS uses the vehicle’s anti-lock brake system wheel-speed signals to detect differences in tire rolling characteristics. It does not measure pressure with a battery-powered valve sensor, so a TPMS battery test does not apply. The system may need calibration after pressures are corrected.
If the vehicle has no individual pressure readings and the manual describes a reset or calibration process, check that process before buying a sensor or tool. Replacing a wheel sensor on an indirect system would not solve the warning.
Troubleshoot an unclear TPMS sensor result
When the test result does not make sense, isolate one variable at a time. Begin with the tire pressure, then verify tool compatibility and placement, and only afterward suspect the sensor or vehicle receiver. This approach avoids replacing a working part because of a simple setup error.
| Result | What it may mean and what to check |
|---|---|
| All sensors respond normally | Battery communication is currently good. Check tire pressure, stored fault codes, and relearn status if the warning remains. |
| One sensor gives no response | Repeat near the valve stem, confirm the vehicle selection and frequency, then have the sensor inspected if it still fails. |
| Sensor responds but shows low battery | Plan replacement of the complete sensor, preferably during tire service. |
| Pressure differs greatly from the gauge | Recheck the gauge, test again, and inspect for a leak or sensor-pressure fault. |
| Tool reads sensors but the vehicle does not | Check sensor IDs, wheel positions, relearn requirements, and vehicle TPMS fault codes. |
When the tool cannot activate a sensor
Confirm that the tool is charged and supports the vehicle’s sensor frequency. Move it close to the valve stem and remove anything that could interfere with positioning. Then repeat the test after selecting the exact vehicle application rather than a similar model.
If one wheel still will not respond while the other wheels do, inspect the valve area for damage and ask a tire professional to test the sensor directly. A completely discharged battery, damaged electronics, incorrect sensor type, or physical sensor failure are all possible.
When the warning returns after a successful test
Recheck tire pressure when the tires are cold. A small leak, temperature change, or incorrect pressure adjustment can bring back a normal low-pressure warning even when all sensors communicate correctly.
If the pressure is correct and the warning light flashes, scan for stored TPMS faults. The problem may involve the receiver, antenna, wiring, body-control module, or a sensor ID that was not learned correctly. These faults usually require vehicle-specific service information.
When tire rotation makes the readings look wrong
Some vehicles automatically locate sensor positions; others store a specific sensor ID at each wheel position. After rotation, the dashboard may temporarily associate a pressure reading with the wrong corner or require a relearn.
Do not replace a sensor simply because its ID appears under a different wheel position. Compare the physical wheel location, stored IDs, and relearn procedure first. A working sensor can be assigned to a new position without changing its battery.
Frequently asked questions about TPMS sensor batteries
These questions address the most common beginner concerns after a TPMS warning or an inconclusive sensor scan.
Can I test a TPMS sensor battery without removing the tire?
Usually, yes. A compatible TPMS activation tool can wake the sensor and read its transmission from outside the tire. This confirms communication and may identify a low-battery condition without exposing the battery.
Does a TPMS warning light prove the battery is dead?
No. The warning can indicate low tire pressure, a leak, a failed sensor, an incorrect sensor ID, a relearn problem, or a vehicle communication fault. Check pressure and scan the sensors before deciding that a battery has failed.
Can I replace only the battery inside a TPMS sensor?
Most original sensors have a sealed battery and are replaced as a complete assembly. Opening the housing can make the sensor unreliable and may create a safety concern inside the tire. Some specialty sensors have serviceable battery designs, so follow the exact manufacturer instructions.
How long can a TPMS sensor last after it reports a weak battery?
There is no dependable universal time. A weak sensor may continue transmitting for a while or fail during the next cold-weather period or tire service interval. Treat the warning as a reason to plan replacement rather than as a precise countdown.
Will driving recharge a TPMS sensor battery?
No. The sensor battery is not normally rechargeable by driving. Some sensors sleep while the vehicle is parked and wake during movement, which can make them appear to start working again, but that is not battery recharging.
Confirm the result before replacing a sensor
Learning how to test tpms sensor battery health starts with the correct tire pressure and the correct system identification. For a direct TPMS vehicle, use a compatible activation tool to read each sensor, compare the reported data with a tire gauge, and look for a low-battery or communication message.
A responding sensor is not automatically guaranteed to have years of battery life remaining, while a nonresponsive sensor is not automatically proven dead. Repeat the test correctly, check IDs and relearn requirements, and involve a tire professional before removing or opening a sensor.
Once the result points to a failed or weak battery, replace the complete sensor, perform the required relearn, and confirm that the dashboard warning stays off. That final verification is what separates a useful diagnosis from simply clearing a warning light.