How to Patch a Tire from the Inside Safely and Correctly at Home
A slow leak does not always mean a tire is ruined. A small nail or screw puncture in the center of a tubeless tire’s tread can sometimes be repaired from the inside with a permanent-style repair. The job is more involved than pushing a rubber plug into the outside, though: the tire must come off the wheel, the inner liner must be prepared, and the repair must seal both the puncture channel and the inside surface.
This guide explains how to patch a tire from the inside on a conventional passenger-vehicle tire with a repairable tread puncture. It does not cover sidewall damage, run-flat construction, inner tubes, motorcycle tires, or a tire that has been driven while severely underinflated. Those situations can hide structural damage and are better handled by a qualified tire technician.
You will learn how to identify a suitable puncture, remove the tire safely, prepare the liner, install the correct repair, and check for leaks. In practice, a professional repair usually uses a combination plug-patch, not a flat patch alone, because the stem seals the puncture path while the patch seals the inner liner.
At a glance
- Repair only a small puncture in the central tread when the tire has no internal or sidewall damage.
- A plug-patch combination is generally more reliable than an inside patch by itself.
- Do not remount or inflate a tire at home unless you have the proper equipment and training.
How to patch a tire from the inside safely and correctly
This method applies to a conventional tubeless tire after it has been removed from the wheel and one bead has been separated from the rim. The repair should be made from the inside so you can inspect the liner and confirm that the puncture did not damage the tire’s cords. If the tire is still mounted, stop before trying to break the bead with improvised tools; a tire can release suddenly and cause serious injury.
Tools you will need
- Approved tire repair kit with a matching combination plug-patch or tire manufacturer-approved internal patch
- Tire removal and bead-breaking equipment appropriate for the tire and wheel
- Valve-core tool and an air source for deflation and later inflation
- Side cutters or flush cutters for trimming a repair stem
- Tire-safe rubber cleaner and a clean, lint-free cloth
- Vulcanizing cement or repair adhesive specified for the patch system
- Inner-liner buffing tool or fine abrasive supplied with the repair kit
- Soapy-water solution for leak testing
- Optional: tire inspection light and chalk or a paint marker for identifying the puncture
Step 1 Confirm that the puncture is a repair candidate
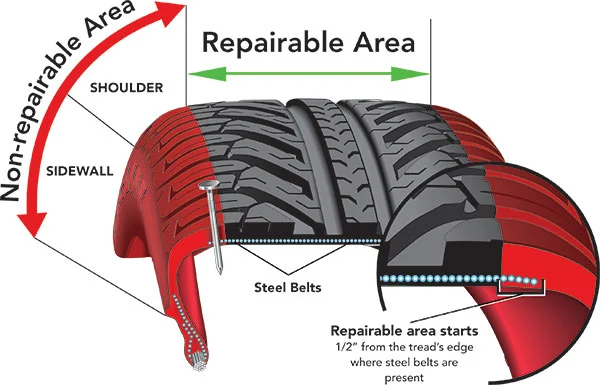
Locate the object that caused the leak and mark its position before removing it. A puncture is generally a candidate only when it is in the central tread area, is small enough for the repair system, and has not stretched, torn, or separated the surrounding rubber.
Check the tire sidewall for its size, construction, and any run-flat designation. The repair kit must be compatible with that tire type. Also look for uneven wear, bulges, exposed cords, cracking, or a bead that has been damaged.
Any of those findings is a reason to replace the tire or have it professionally evaluated rather than patching it.
Do not repair a puncture in the sidewall or shoulder. The shoulder is the rounded area where the tread begins to turn toward the sidewall, and it flexes too much for a dependable repair. If you cannot clearly tell whether the hole is in the repairable tread zone, do not continue.
Step 2 Remove the tire and inspect the inside
Deflate the tire completely by removing the valve core, then separate the bead from the rim with proper tire equipment. Keep the wheel supported and follow the equipment manufacturer’s instructions. Avoid screwdrivers, homemade bead breakers, open flames, and uncontrolled compressed air.
Once one side of the tire is open, inspect the entire inner liner. Look for a dark, abraded ring, loose rubber dust, wrinkles, cuts, or areas that feel softer than the surrounding liner. These signs can indicate that the tire was driven while flat or badly underinflated.
A puncture that looks minor from the outside may have caused serious internal damage.
Find the entry point from inside and compare it with the outside mark. If the puncture path is angled, torn, unusually large, or close to the shoulder, do not force a repair into it. A professional tire shop can make the final determination, and replacement is often safer than trying to save a compromised casing.
Important
Never patch over internal damage, exposed cords, a bulge, or evidence that the tire was driven without enough air. An internal patch cannot restore damaged reinforcement layers.
Step 3 Remove the puncturing object and clean the repair area
With the tire safely accessible, pull out the nail, screw, or other object using pliers. If it is still holding air, remove it only after the tire is controlled and supported; the tire should not be relied on to remain inflated while you work.
Clean the inner liner around the puncture with the cleaner approved for your repair system. Remove dirt, moisture, mold-release residue, and loose rubber, but do not soak the area or use gasoline, brake cleaner, acetone, or an unapproved solvent. The repair adhesive needs a clean, dry surface that will not react with the chemical.
Mark a repair circle large enough for the patch, following the patch manufacturer’s instructions. The marked area should be centered over the puncture and should extend beyond any scuffed or damaged rubber. A clean outline helps prevent you from applying adhesive to an area that has not been properly prepared.
Step 4 Prepare the inner liner without cutting into the cords
Use the buffing tool or abrasive specified by the repair kit to roughen the marked area. Work evenly until the glossy surface becomes uniformly dull. The goal is to create a clean bonding texture, not to remove a deep layer of rubber.
Keep the buffed area flat and centered on the hole. Do not grind aggressively, create a depression, or expose the textile or steel cords. Remove buffing dust with a clean, dry cloth or the method specified by the kit.
The surface should be dry, matte, and free of loose particles before cement is applied.
For a flat inside patch, lightly beveling or preparing the puncture opening may be part of the kit instructions. Do not enlarge the hole simply to make a patch fit. The repair material should match the puncture and the tire’s construction rather than compensate for an incorrect repair size.
Step 5 Choose and position the internal repair
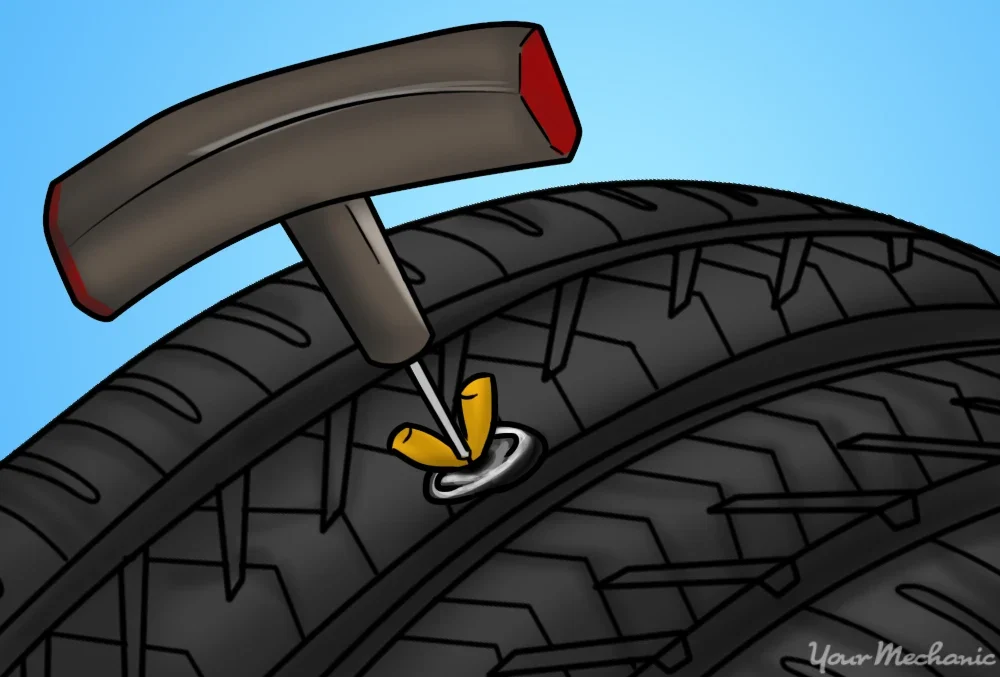
Use a repair approved for the tire and puncture size. A combination plug-patch has a flexible stem that passes through the puncture and a broad patch that bonds to the inner liner. The stem closes the hole through the tread, while the patch helps prevent air from traveling between the tire layers.
A useful way to approach how to patch a tire from the inside is to check your progress after each stage.
A flat patch without a stem may seal the liner but leave the puncture channel open. That can allow air and moisture to migrate through the tire, so a patch-only repair is not the preferred permanent repair for most tread punctures. If your kit contains only a flat patch, follow its instructions and understand that a tire professional may recommend a plug-patch repair instead.
Dry-fit the repair before applying adhesive. Center the patch over the prepared circle, and check that the stem lines up with the puncture without bending sharply. The patch should lie flat with no folds, lifted edges, or contact with a rib, bead, or irregular area of the liner.
Step 6 Apply cement and install the repair
Apply the specified vulcanizing cement to the prepared liner and, if required by the system, to the repair stem. Use an even coat rather than a thick puddle. Follow the product’s instructions for any wait period; some systems need the cement to become tacky before the patch is placed.
Push the stem through the puncture from the inside while keeping the patch centered. Pull or guide it only as the repair instructions allow. Do not twist the patch, stretch it off-center, or drag its adhesive surface across dirty rubber.
Press the patch firmly from the center outward with the supplied stitcher or roller. This removes trapped air and forces the adhesive into full contact with the prepared liner. Pay particular attention to the edges, because a lifted edge is a likely leak path.
When the repair has bonded as directed, trim the outside stem nearly flush with the tread using cutters. Do not leave a long stem that can catch on the road, and do not cut so aggressively that you pull the repair out of the puncture. The finished repair should be smooth and secure, with the patch fully bonded inside.
Helpful tip
Do not add extra cement around the patch edge after installation unless the repair system specifically calls for it. An unapproved coating can hide a lifted edge without creating a dependable bond.
Step 7 Allow the repair to set and check its bond
Keep the repaired area clean and undisturbed for the time and conditions specified by the repair manufacturer. Some products are designed for a particular temperature range or require a minimum cure period. Do not guess if the instructions are missing; take the tire to a tire shop instead.
Inspect the patch edge all the way around. It should be flat against the liner, without wrinkles, bubbles, gaps, or a shiny strip where the adhesive failed to contact the rubber. Gently look for movement at the edge, but do not pry under it.
If the patch is off-center, contaminated, wrinkled, or lifting, do not attempt to cover it with another patch. Remove the tire repair only as directed by the kit manufacturer and have the tire evaluated. Multiple overlapping repairs can weaken the liner and make later inspection difficult.
Step 8 Reassemble, inflate, and perform a leak test
Before the tire is remounted, make sure no tools, cloth, or loose rubber remain inside. The bead and rim must be clean and undamaged, and the valve stem should be inspected for leaks. Reassemble the tire only with proper tire-changing equipment and the correct lubricant.
Inflate the tire using a restrained setup and the vehicle or tire manufacturer’s specified pressure. Never exceed the tire’s marked maximum pressure during seating, and never stand over the tire or place your body in the likely path of a bead release. If the bead does not seat normally, stop and use professional equipment.
Apply soapy water to the repaired tread, the patch area if accessible, the valve stem, and both bead areas. Watch for a growing stream of bubbles. A few bubbles caused by the test solution settling are different from bubbles that repeatedly expand from one location.
After the leak test, check the tire pressure with a reliable gauge and compare it with the vehicle placard, not the maximum pressure molded into the sidewall. Recheck the pressure after the tire has sat and again after the vehicle has been driven only if the repair passed the initial inspection. Any pressure loss or new vibration means the tire should not be used until it is evaluated.
Understanding how to patch a tire from the inside also means recognizing the limits of the method.
What makes an inside tire repair dependable?
An internal repair works because it addresses more than the visible hole. The inner liner is the airtight layer inside a tubeless tire, but a puncture can also create a path through the tread rubber. A properly fitted plug-patch closes that path and bonds to sound liner material around it.
The repair location matters as much as the patch itself. The center tread flexes less and has a more predictable thickness than the shoulder or sidewall. Repairs outside the accepted tread zone may separate as the tire flexes, even when the patch initially appears to hold air.
Patch, plug, and plug-patch are not interchangeable
An outside plug is inserted without removing the tire. It can be useful as a temporary measure in an emergency, depending on the product and circumstances, but it does not let you inspect the inside of the tire. An internal patch is bonded to the liner but may not close the full puncture channel.
A combination repair uses both functions in one repair unit. For a conventional tread puncture, that is why many tire repair standards and manufacturers prefer a plug-patch installed after internal inspection. Always defer to the tire manufacturer, repair-kit instructions, and local professional practice when they differ.
When a tire should be replaced instead
Replacement is the safer choice when the tire has sidewall or shoulder damage, a cut rather than a clean puncture, exposed cords, a bulge, severe cracking, significant uneven wear, or internal abrasion from being driven flat. A tire that has already had an unsuitable repair may also need professional inspection before another repair is considered.
Run-flat tires and other specialty constructions require special procedures. Their internal components can be damaged without obvious external clues, and some manufacturers restrict repairs. The same caution applies to tires with sealant, foam inserts, or an inner tube.
How to verify the repair before driving
The repair is not complete merely because the tire holds air immediately after installation. Verification should show that the patch is bonded, the puncture channel is sealed, and no other component is leaking.
- Confirm that the patch edge is flat and fully bonded with no wrinkles, bubbles, or lifted sections.
- Check the trimmed stem and surrounding tread for an open hole or loose rubber.
- Test the repair and both bead areas with soapy water and watch for growing bubbles.
- Test the valve core and valve stem separately; a repaired puncture is not the only possible leak.
- Set cold inflation pressure from the vehicle placard or manufacturer’s instructions.
- After installation, confirm that the wheel is secure and that there is no rubbing or visible distortion.
- Stop driving if the tire loses pressure, vibrates, pulls, or produces unusual noise.
For a tire repaired outside a shop, an independent professional inspection is a sensible final check, especially if the tire was driven while low or if you are uncertain about the repair system. Do not treat a successful bubble test as proof that hidden structural damage is absent.
Common problems with an inside tire patch
Most failed repairs trace back to an unsuitable puncture, poor liner preparation, contamination, incorrect adhesive, or a patch that was not rolled down evenly. The symptoms below can help you decide whether to stop and seek professional help.
| What you observe | What it may indicate | What to do |
|---|---|---|
| Bubbles at the patch edge | Incomplete bonding, contamination, or a wrinkled patch | Do not drive on it; have the repair removed and evaluated. |
| Bubbles from the tread stem | The puncture channel is not sealed or the repair is wrong size | Do not add sealant; use an approved replacement repair or a tire shop. |
| Leak from the bead or valve | A separate wheel, valve, or bead problem | Repair the actual leak source before judging the patch. |
| Visible cords, bulge, or inner abrasion | Structural damage, often from underinflation | Replace the tire or obtain a professional inspection. |
| Patch will not lie flat | Wrong patch size, curved location, or poorly prepared liner | Stop; do not overlap another patch. |
Why the patch keeps leaking
If bubbles form around the patch, remove the air pressure only after the tire is safely controlled and inspect the bond. A shiny, dirty, damp, or insufficiently buffed liner can prevent adhesion. So can using the wrong cement or applying the patch after the cement has dried beyond its usable bonding window.
If the patch looks perfect but air escapes from the puncture, the stem may be too small, improperly installed, or absent. A flat patch cannot reliably compensate for a puncture channel that remains open. Have the tire repaired with a compatible combination unit or replaced.
When to stop troubleshooting
Stop immediately if the tire will not seat, the bead leaks continuously, the tire has a bulge, or the repair location is near the shoulder. Also stop if you lack a safe way to break the bead, mount the tire, or inflate it under restraint. The tire-changing portion can be more hazardous than the patching portion.
Frequently asked questions
Can I patch a tire from the inside without removing it from the wheel?
No. An internal patch requires access to the inner liner, so the tire must be separated from the rim at least enough to inspect and prepare that surface. Removing and remounting a tire safely requires appropriate equipment; a tire shop is the practical choice if you do not have it.
Is an inside patch better than an outside plug?
An inside repair allows inspection and can create a more complete repair, but a flat patch alone may not seal the puncture channel. For many repairable tread punctures, a combination plug-patch is preferred. An outside plug should not be used to avoid inspecting a tire that may have been driven underinflated.
How close to the sidewall can a tire be repaired?
There is no safe universal distance for every tire, but punctures in the shoulder and sidewall are generally not repairable. Tire manufacturers and repair systems define the acceptable repair zone. If the hole is outside the central tread area, have the tire inspected rather than guessing.
Can I repair a tire that was driven flat?
Usually not without a professional internal inspection. Driving with very low pressure can create heat and abrasion inside the sidewall, and that damage may not be visible from outside. If the inner liner shows scuffing, dust, wrinkles, or exposed material, replacement is safer.
How do I know whether the patch is cured?
Use the repair manufacturer’s specified cure instructions rather than relying on appearance alone. The patch should be firmly bonded, flat, and free of edge bubbles, but a visual check cannot replace the product’s required setting conditions or a leak test.
Finish with a verified, properly sealed repair
Learning how to patch a tire from the inside is useful when you need to understand what a correct repair involves, but the safest result depends on more than sticking rubber over a hole. The puncture must be in the repairable tread, the tire must be free of internal damage, and the repair should seal both the liner and the puncture channel.
Use a compatible plug-patch system, prepare the liner carefully, test every likely leak source, and stop when the tire’s condition or the mounting equipment is uncertain. If the repair bubbles, loses pressure, sits near the shoulder, or follows a drive-flat event, replace the tire or have a qualified tire professional inspect it before you drive.