How to Replace Maf Sensor: Setup Steps and Troubleshooting Tips
A failing mass airflow sensor can make a vehicle hesitate, idle roughly, stall, or use more fuel than usual. Because those symptoms can also come from a vacuum leak, dirty throttle body, clogged air filter, or ignition problem, replacing the sensor should begin with a basic diagnosis rather than guesswork. The good news is that many MAF sensors are accessible near the air filter housing and can be replaced with ordinary hand tools.
This guide explains how to replace maf sensor safely on a typical gasoline vehicle. You will learn how to confirm the replacement part, disconnect the electrical connector without damaging it, remove the old sensor, install the new one in the correct airflow direction, and check the result with a road test or scan tool.
Vehicle designs vary, so use the service information for your exact year, make, model, and engine when it disagrees with this general procedure. If the sensor is built into a larger air-measuring assembly, access is restricted, or the wiring is damaged, stop before forcing anything and have a qualified technician inspect it.
At a glance
- Verify the exact MAF sensor application before removing the old part.
- Handle the sensor element and electrical connector gently; do not spray the element with ordinary cleaner.
- After installation, check for intake leaks and confirm that the warning light and drivability symptoms improve.
How to Replace MAF Sensor Safely and Verify the Result
On most vehicles, the MAF sensor sits in the intake tract between the air filter housing and the throttle body. The sensor measures incoming air so the engine control module can calculate how much fuel to inject. Replacement is usually straightforward, but a wrong part, loose intake clamp, or disconnected hose can create the same symptoms as a failed sensor.
Tools you will need
- The correct replacement MAF sensor for the vehicle and engine
- Basic socket or screwdriver set, including a Torx bit if the sensor uses Torx screws
- Safety glasses and mechanic’s gloves
- Optional: OBD-II scan tool for reading and clearing diagnostic trouble codes
- Optional: Digital multimeter for checking wiring when the sensor itself has not been confirmed faulty
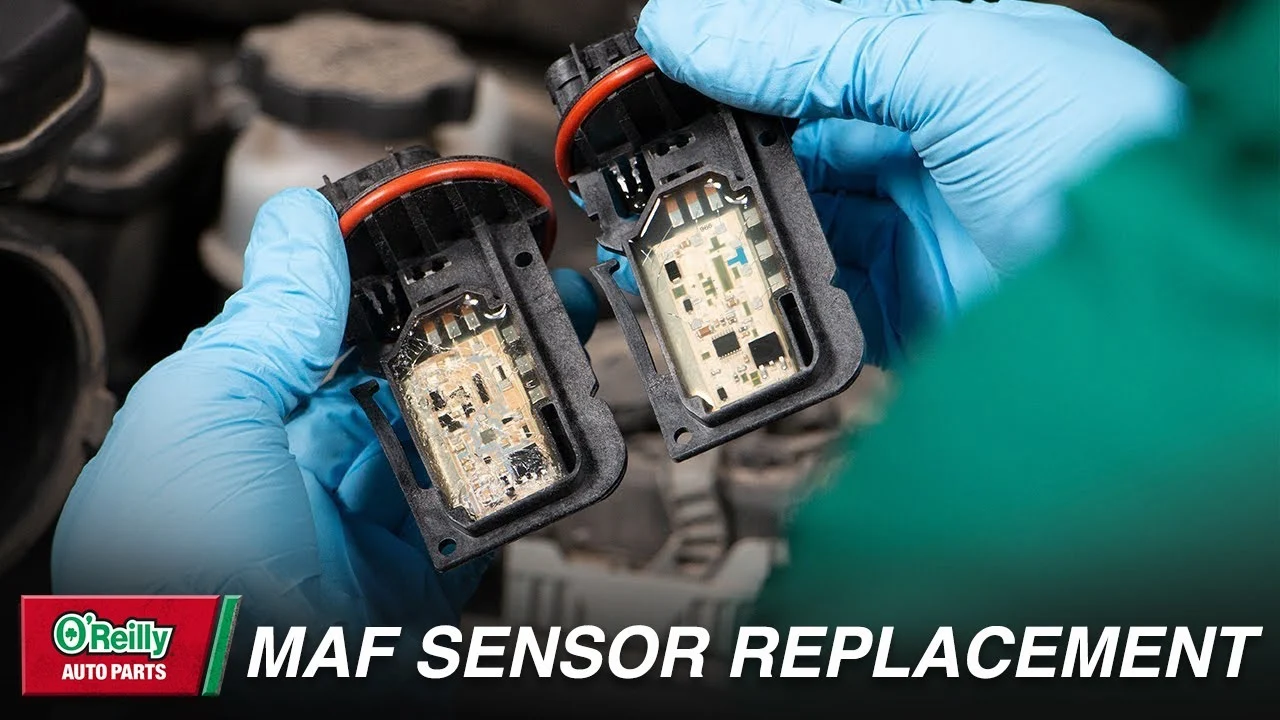
Step 1 Confirm the diagnosis and identify the correct replacement
Park on a level surface, switch off the engine, and let the intake area cool. Open the hood and locate the air filter housing. Follow the large intake tube toward the engine; the MAF sensor is commonly attached to that tube or incorporated into the housing cover.
Before buying a part, record the vehicle identification number and confirm the year, engine size, fuel system, and connector shape. Compare the replacement sensor with the original, including the mounting pattern, sensor body, electrical plug, and any airflow-direction arrow. A part that fits physically but is calibrated for a different engine can cause poor running and recurring fault codes.
If the check-engine light is on, scan for codes before disconnecting the battery. Codes such as P0100 through P0104 can point toward the MAF circuit, but they do not prove that the sensor itself is bad. Inspect the intake tube and wiring first; a cracked tube or rubbed-through wire can trigger the same family of codes.
Important
Do not replace the sensor solely because a generic scan code mentions MAF performance. If the air filter is badly restricted, the intake has an unmetered-air leak, or the connector has corrosion, replacing the sensor may not solve the problem.
Step 2 Prepare the vehicle and protect the electrical system
Remove the key from the ignition and keep the engine off. Set the parking brake. On many vehicles, disconnecting the negative battery cable is a sensible precaution, but check the owner’s manual first because some vehicles require radio codes, window recalibration, or special procedures after battery power is removed.
If you use a scan tool, record the stored codes and freeze-frame information before disconnecting the battery. Freeze-frame data is a snapshot of engine conditions when a fault was detected. It may help if the warning light returns after the replacement.
Do not work around the intake with loose jewelry, dangling clothing, or a running engine. Keep screws and clips in a small container so they cannot fall into the air filter housing or intake tube.
Step 3 Inspect the air intake and connector before removal
Trace the entire intake path from the air filter housing to the throttle body. Look for a split rubber boot, loose clamp, disconnected breather hose, missing housing clip, or air filter that is badly dirty or wet. The MAF sensor must measure air that actually enters the engine; air entering through a crack downstream of the sensor is not measured and can create a lean-running condition.
Examine the electrical connector and nearby wiring. Look for bent terminals, green corrosion, oil contamination, broken locking tabs, or wires pulled tight against the connector. If the plug or harness is damaged, replacing the sensor alone is unlikely to provide a reliable repair.
This inspection is also a useful point to stop. If you find a large intake leak, repair it or have it repaired before condemning the sensor. If the wiring is damaged, obtain the correct wiring diagram rather than guessing at power and ground terminals.
Step 4 Disconnect the MAF electrical connector
Press or lift the connector’s locking tab according to its design, then pull the plug straight away from the sensor body. Some connectors have a secondary lock that must slide or lift before the main tab releases. Use a small trim tool only when the connector design allows it; do not pry against the sensor’s terminals or yank on the wires.
Observe how the connector releases before applying force. A connector that will not move usually still has a lock engaged. Once removed, place the connector where it will not hang by the wiring, and inspect the terminals again for moisture or corrosion.
A successful disconnection leaves the pins straight and the locking mechanism intact. If a terminal comes out of the plastic housing or the connector breaks, stop and repair the connector correctly before installing a new sensor.
Step 5 Remove the old sensor without dropping debris into the intake
Loosen the hose clamp or fasteners that secure the MAF housing, depending on the vehicle design. Some sensors are held by two screws; others are part of a larger air filter cover or intake assembly. Support the surrounding tube or housing while removing the final fastener so it does not twist or crack.
Lift the old sensor out carefully. Keep the open intake covered with a clean, lint-free cloth if the air filter housing must remain open for more than a moment. Do not allow dirt, screws, or pieces of the old seal to fall into the intake tract.
Compare the removed part with the new one before discarding it. The airflow arrow, sealing ring, connector position, and mounting holes should correspond. If the parts differ unexpectedly, pause and verify the application rather than modifying the new sensor.
Step 6 Install the replacement in the correct airflow direction
Remove any protective cap from the new sensor. Install it in the same orientation as the original, following the airflow arrow toward the engine or throttle body. The arrow is important because the sensor is calibrated for air moving in one direction.
Seat the sensor or housing evenly, making sure the O-ring or gasket is properly positioned and not pinched. Start all screws by hand, then tighten them evenly with modest force. Use the vehicle’s service specification when available; overtightening can distort plastic or damage the sensor housing.
Reconnect every hose and tighten each clamp securely, but do not crush the rubber intake tube. A good installation leaves no visible gap around the sensor and does not allow the tube to rotate freely at the connection.
Step 7 Reconnect the electrical plug and reassemble the intake
Push the electrical connector onto the replacement sensor until the lock clicks or returns to its locked position. Do not force it at an angle. The plug should be fully seated, with no part of the terminal block visibly exposed beyond its normal position.
Check that the air filter is seated correctly and that the housing cover is clipped or fastened all the way around. Reconnect breather hoses and small vacuum lines exactly as they were routed. A hose left disconnected can produce an unstable idle and a false impression that the new MAF sensor is defective.
Before starting the engine, perform a final visual check: no tools remain in the engine bay, the intake tube is fully clamped, the connector is locked, and the battery cable is secure if it was removed.
Step 8 Start the engine and check for immediate problems
Start the engine and let it idle. It may run differently for a short time if the battery was disconnected or the engine control module lost learned adjustments. Do not rev the engine repeatedly to “test” the sensor; a calm idle check is more useful.
A useful way to approach how to replace maf sensor is to check your progress after each stage.
Listen for a hissing intake leak and watch for an unusually high or unstable idle. Check that the check-engine light does not begin flashing. A flashing warning light can indicate a severe misfire that may damage the catalytic converter, so shut the engine off and seek diagnosis rather than continuing to drive.
Inspect the intake connections while the engine idles, keeping hands, hair, and clothing away from belts, fans, and other moving parts. If the engine stalls immediately, switch it off and recheck the connector, intake tube, air filter housing, and battery connection.
Step 9 Clear codes only after recording them, then verify the repair
If a scan tool is available, read the codes again after the engine has started. Clear stored codes only after recording them and only when the repair appears complete. Clearing a code does not repair a fault, and some monitors will need to run again before the vehicle is ready for emissions testing.
Take a cautious drive on familiar roads. Begin with gentle acceleration, then observe idle quality, throttle response, and whether hesitation or stalling has stopped. Avoid heavy traffic until the vehicle behaves normally.
If the warning light remains off and the original symptoms are gone, the replacement is probably addressing the problem.
For a more complete check, use the scan tool to look at live data such as MAF airflow and fuel-trim values. The exact readings vary widely by engine and operating condition, so compare them with factory specifications rather than relying on a universal number. A technician should investigate if the readings remain implausible or the symptoms continue.
Check your result
A successful result is a fully sealed intake, a firmly locked connector, smooth idle, normal acceleration, and no returning MAF-related code after the vehicle has been driven through its normal operating conditions.
What the MAF Sensor Does and Why Replacement Can Fail
The mass airflow sensor measures the amount of air entering the engine. The engine control module uses that information with oxygen-sensor feedback, throttle position, engine speed, and other inputs to calculate fuel delivery. A contaminated or electrically faulty sensor can report too much or too little air, affecting the air-fuel mixture.
Replacement is not always the first or best repair. An air leak after the sensor allows unmeasured air into the engine, while a blocked air filter limits the air the sensor can measure. Water intrusion, oil from an over-oiled aftermarket filter, poor wiring, or a faulty ground can also create MAF symptoms.
When researching how to replace maf sensor, beginners often find advice to clean the old sensor first. Cleaning can help when the sensor element is contaminated, but it is not a substitute for replacement when the electronics or sensing element have failed.
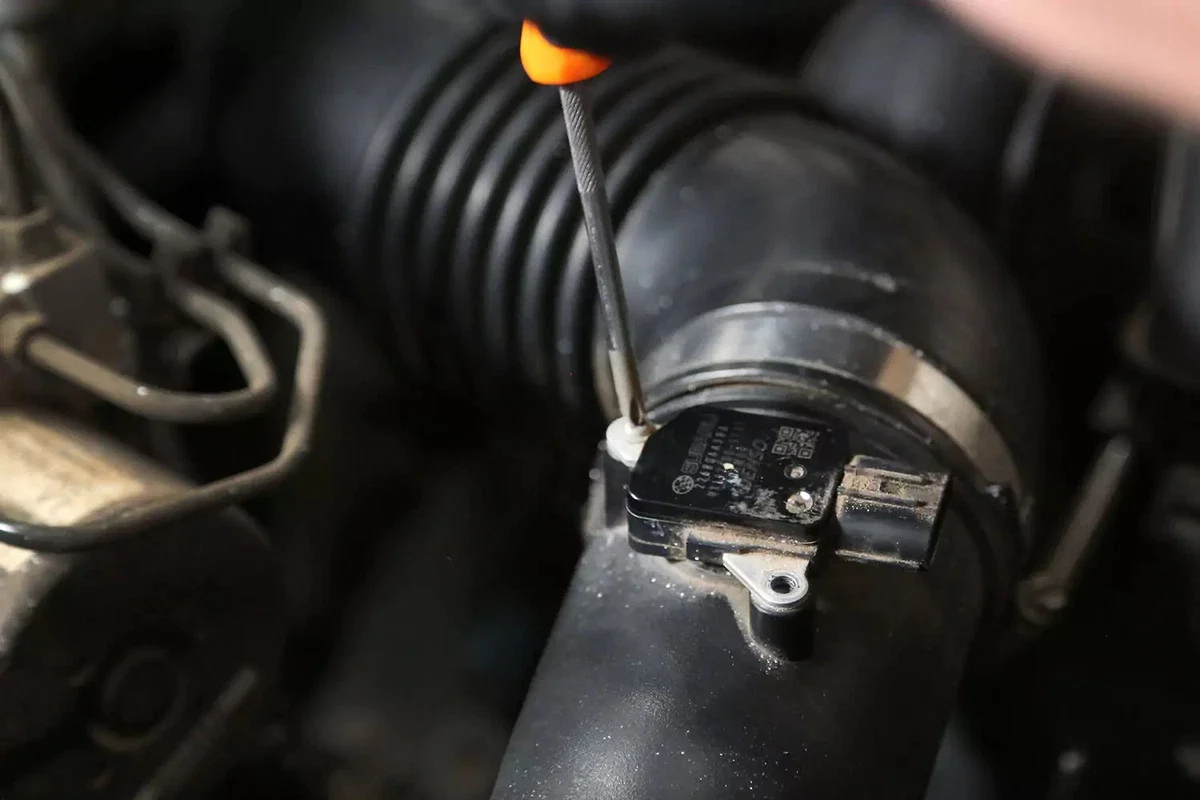
Should you clean the old sensor?
Only use a cleaner specifically labeled for MAF sensors, and follow its instructions. Remove the sensor if the vehicle design permits it, spray the sensing area without touching the delicate element, and allow it to dry completely before reinstalling it.
Never use brake cleaner, carburetor cleaner, compressed air, a brush, or a cloth on the sensing element unless the manufacturer explicitly permits that method. These products or physical contact can damage a sensor that might otherwise have been usable.
Why the replacement may not fix the symptoms
Persistent symptoms after installation usually mean the original diagnosis was incomplete, the replacement is incorrect, or another issue is present. Common possibilities include:
- An intake leak between the MAF sensor and throttle body
- A loose or corroded electrical connector
- Damaged MAF wiring or a poor sensor ground
- A dirty air filter or restricted intake
- Ignition misfire from a spark plug or ignition coil problem
- Fuel delivery, vacuum, throttle body, or oxygen-sensor trouble
- A defective aftermarket replacement part
Do not install a second sensor immediately if the first replacement changes nothing. Recheck the basics and scan for new codes. If the fault code changes from a circuit code to a mixture or misfire code, that change is useful diagnostic information rather than proof that the new sensor is bad.
How to Check the Repair After Installation
Verification should combine a physical inspection, an operating check, and—when practical—scan data. No single test proves that every part of the air and fuel system is healthy, but these checks can reveal a loose connection or an unresolved intake problem quickly.
Physical inspection results
With the engine off and cool, gently check that the intake tube is secure at both ends. Confirm that the air filter housing is closed, every hose is attached, and the MAF connector cannot be pulled off without releasing its lock.
Look for a pinched seal, a screw that was not installed, or a clamp sitting beside rather than over the intake lip. These small installation errors can let air bypass the sensor and may not be obvious from inside the vehicle.
Driving and warning-light results
During the test drive, the engine should respond smoothly when accelerating from a stop and when cruising steadily. A brief change in idle after battery disconnection can be normal, but repeated stalling, severe hesitation, or a new warning light requires further diagnosis.
If the check-engine light returns, scan it before clearing it again. Record the exact code and the conditions under which it appeared. That information is more valuable than repeatedly replacing parts.
When professional diagnosis is the better choice
Seek qualified help if the sensor is inaccessible, the wiring has been modified, the engine runs dangerously lean or rich, the warning light flashes, or the vehicle stalls in traffic. Also stop if removing the sensor requires disturbing fuel lines, high-voltage ignition components, or a complicated airbox assembly you cannot identify confidently.
A professional may test circuit voltage, ground quality, signal behavior, fuel trims, smoke-test the intake for leaks, and compare live data with manufacturer specifications. Those tests can separate a bad sensor from an electrical or mechanical problem.
Troubleshooting Common MAF Replacement Problems
The symptoms below are clues, not automatic diagnoses. Check the simplest installation errors first, then return to the vehicle-specific service information or obtain a proper diagnostic test.
| What you observe | Likely areas to check |
|---|---|
| Engine will not start or starts and stalls | Connector not fully seated, intake tube disconnected, battery connection, incorrect sensor application |
| High or hunting idle | Air leak after the sensor, loose breather hose, pinched gasket, throttle or vacuum issue |
| Same MAF code returns | Wiring, power or ground circuit, connector terminals, wrong part, or an unmetered-air leak |
| Hesitation remains but no MAF code appears | Ignition, fuel delivery, throttle body, air filter, or another engine-management fault |
What if the connector will not release?
Inspect the plug closely for a sliding lock, hinged lock, or secondary tab. Move the lock in its intended direction while gently pulling the connector body, never the wires. If the plastic is brittle or the lock is broken, forcing it can turn a simple sensor replacement into a wiring repair.
What if the check-engine light stays on?
A light that remains on immediately may reflect a stored code that has not been cleared, or it may indicate that the fault is still present. Scan the vehicle and read the current and pending codes. Some systems also need several normal drive cycles before a repaired fault is confirmed.
What if the new sensor causes worse running?
Turn the engine off and compare the new part with the original. Check the airflow direction, seal, connector seating, and intake clamps. If everything is correct, the replacement may be defective or incompatible, but verify the circuit and intake before returning it.
Beginner FAQs About MAF Sensor Replacement
Can I replace a MAF sensor without disconnecting the battery?
Often, yes, because the procedure usually involves unplugging a low-voltage sensor connector with the ignition off. However, disconnecting the negative cable can reduce electrical risk and may reset learned data. Follow the owner’s manual, especially if the vehicle has battery-reset requirements or electronically controlled features.
How long does a MAF sensor usually last?
There is no universal service interval. Life depends on air-filter maintenance, moisture and oil contamination, vibration, wiring condition, and the vehicle’s environment. Replace it when testing and symptoms support failure, not simply because the vehicle has reached a particular mileage.
Can a dirty air filter damage the MAF sensor?
A severely dirty filter can restrict airflow and affect engine performance, while a damaged or poorly sealed filter can allow debris to reach the sensor. An over-oiled reusable filter can also contaminate some sensor elements. Correct the filter or housing problem so the replacement does not fail for the same reason.
Do I need to program a new MAF sensor?
Most conventional MAF sensors do not require separate programming. The engine control module may need time to relearn operating adjustments, and some vehicles have manufacturer-specific reset or adaptation procedures. Check the service information for the exact vehicle rather than assuming all models work the same way.
Can I drive with a bad MAF sensor?
A short, gentle drive for diagnosis may be possible, but continued driving can cause poor fuel control, stalling, misfires, or catalytic-converter damage in some situations. Do not drive if the engine is stalling, the warning light is flashing, or the vehicle cannot accelerate safely.
Finish the Repair With a Careful Verification
Learning how to replace maf sensor is mainly a matter of correct identification, careful connector handling, proper airflow orientation, and a sealed intake system. The replacement itself is often simple, but the diagnosis matters just as much as the installation.
After fitting the sensor, inspect every hose and clamp, start the engine without forcing the throttle, scan for returning codes, and take a cautious test drive. If the original symptoms remain or the wiring and intake do not look sound, stop replacing parts and arrange a proper diagnostic inspection.