Why Won’t My Tire Plug Go in — Common Triggers, Signs, and Fixes
A tire plug usually will not go in because the puncture is too small, the reamer did not open it fully, or the plug and insertion tool are the wrong size.
Why won’t my tire plug go in when the puncture looks simple? The counterintuitive part is that a small, clean hole can be harder to plug than a slightly larger one. A rope plug must pass through tough steel-belted rubber, and forcing it can damage the tool, push the plug into the tire, or enlarge the injury.
Fit matters more than brute force. The puncture may also be in an unsafe location, angled sharply, contaminated with metal, or too close to another repair. This guide explains how to distinguish a tight but repairable hole from a tire that should not be plugged, how to use the reamer and insertion tool correctly, and when to stop and seek a tire professional.
You will learn what resistance is normal, which mistakes commonly block the plug, how to check for leaks after installation, and why a temporary string plug is not always an acceptable permanent repair. By the end, you can make a safer decision instead of simply pushing harder.
- ✓A plug should require firm pressure, but extreme force usually signals a fit, preparation, or safety problem.
- ✓The puncture must be in the tread and small enough for the specific plug kit; sidewall damage is not a plug repair.
- ✓Use the reaming tool to clean and size the channel, but do not enlarge a damaged area just to make a plug fit.
- ✓Inflate and test the repaired tire for leaks, then arrange a proper internal repair or replacement when appropriate.
Why Won’t My Tire Plug Go In?
A rope plug is designed to be slightly oversized so it seals the puncture as it enters. Some resistance is expected, especially with a new plug and a cold tire. However, the handle should move with controlled, steady pressure rather than requiring your full body weight.
The problem is often not the tire alone. A short plug, a bent insertion needle, a narrow tool, or a puncture that enters at an angle can make an otherwise usable repair feel impossible. Start by identifying which part of the process is resisting before applying more force.

- Hole size: A very small puncture may not be open enough for the plug and tool to pass together.
- Tool condition: A damaged fork, rough shaft, or loose handle can catch the rubber.
- Plug position: The plug should sit centered in the insertion slot, with similar lengths extending on both sides.
- Repair location: A shoulder or sidewall injury should not be treated like a tread puncture.
The puncture was not properly reamed
The reamer removes debris and creates a passage for the plug. If it was inserted only partway, used at the wrong angle, or pulled out immediately, the channel may still be too tight. A puncture caused by a screw can also have an irregular path rather than a straight round tunnel.
Insert the reamer along the same path as the original object, not perpendicular to the tread unless that matches the injury. Work it in and out several times with controlled motion. Do not twist aggressively or repeatedly widen the hole beyond what the kit instructions allow.
The plug is too thick or the tool is too
Not all tire plug kits use the same rope diameter. A heavy-duty plug paired with a narrow puncture can create excessive friction, while a large insertion tool may not fit through the injury even after reaming. Some inexpensive kits also have a plug that is too short to form a reliable seal.
Compare the plug with the tool slot and the puncture size. If the kit gives a recommended tire or hole range, stay within it. Lubricant supplied for the kit can reduce insertion friction, but household oil or petroleum products should not be substituted because they may affect rubber.
How to Prepare the Tire and Plug Without Making It
Before inserting anything, locate the leak and remove the puncturing object only if you are prepared to repair or replace the tire immediately. Mark the injury with chalk or a pen because the hole can be difficult to find once the object is removed and the tire shifts.
Keep the tire mounted during a temporary roadside plug, but work with the wheel safely supported and the valve accessible. If the tire is severely deflated, avoid driving on it first; driving while flat can damage the sidewall and turn a simple tread puncture into an unrepairable tire.
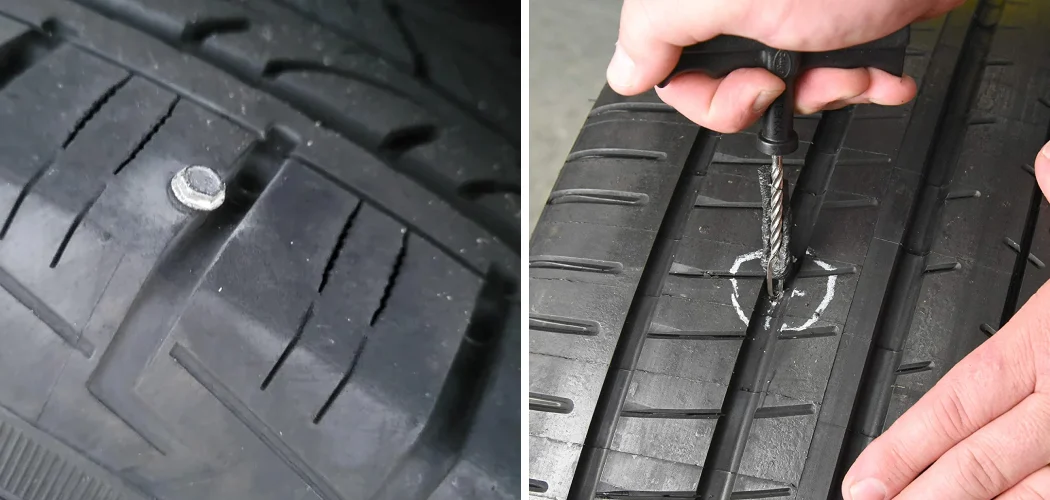
- Confirm the location: The injury should be in the central tread area, away from the shoulder and sidewall.
- Clean the path: Remove loose rubber, wire, and debris without probing blindly.
- Prepare the plug: Center it in the insertion tool and use only the recommended lubricant.
- Protect your hands: Wear gloves and keep your face and fingers away from the tool’s line of force.
Use the reamer with alignment, not force
Hold the reamer in line with the puncture’s path. Push until the roughened portion is inside the tire, then move it in and out several times. The goal is to clean and prepare the channel, not to drill a new hole.
This distinction matters when answering “why won’t my tire plug go in”.
If the reamer will not enter at all, the puncture may be too narrow for that kit, the object may still be lodged inside, or the injury may have a complicated angle. Stop and inspect rather than hammering the tool. Excessive widening can remove the rubber needed to seal the plug.
Load and insert the plug correctly
Thread the plug through the insertion tool’s eye or fork according to the kit design. It should be centered, with the ends reasonably even. A plug loaded too far to one side can bunch against the tire and feel much thicker than it really is.
Apply a thin layer of approved lubricant, place the tool tip at the same angle as the prepared channel, and push steadily. Many kits are designed for the plug to remain partly outside the tread before the tool is withdrawn. Do not bury the entire plug inside the casing.
- Keep the angle consistent: A sudden change in direction makes the plug catch on the inner rubber.
- Use steady pressure: Brief, controlled pressure is safer than swinging or striking the handle.
When Resistance Means You Should Stop
Some resistance is normal, but a plug that will not go in after the channel has been properly prepared deserves a pause. Continuing can tear the tread, separate the plug, bend the tool, or push material into the tire where it cannot seal the leak.
The repair may also be unsafe even if you can force it through. A plug is intended for a suitable tread puncture, not for every type of tire damage. The location, size, internal condition, and tire history all matter.

- Sidewall or shoulder damage: Do not plug these areas because they flex heavily and are critical to tire structure.
- Large or irregular cuts: A rope plug may not bridge missing rubber or a torn puncture.
- Visible cords: Exposed steel or textile cords indicate structural damage, not a simple leak.
- Run-flat damage: A tire driven while underinflated may have hidden internal damage even when the outside looks acceptable.
Signs the puncture is outside the safe repair zone
A puncture near the outer tread blocks or curved shoulder is difficult to seal reliably because that area flexes as the tire rolls. If the injury is on the sidewall, replacement is generally the appropriate choice rather than plugging it.
Also stop if you find multiple punctures close together, a tear rather than a round penetration, or a repair that overlaps an existing repair. The tire may have lost too much material to support another plug.
Signs the tire has internal damage
Look for a bulge, uneven shape, exposed cords, chewed sidewall rubber, or a section that appears pinched. These signs can result from driving on a flat or badly underinflated tire. A plug only seals an opening; it cannot restore damaged casing layers.
If the tire was driven for more than a short distance while flat, have it inspected from the inside. Internal damage may not be visible from the tread surface, and adding air can temporarily hide the problem. Keep these limitations in mind when considering “why won’t my tire plug go in”.
What to Do if the Plug Still Will Not Enter
If the puncture is in the tread and the tire appears structurally sound, remove the insertion tool and reassess rather than forcing it. Check that the plug is centered, the reamer reached the correct depth, and the tool is aligned with the original puncture path.
Try one careful reaming cycle if the channel is clearly tight. If the tool still will not pass, use a compatible plug and insertion tool rather than enlarging the hole indefinitely. A tire shop can dismount the tire and inspect the inside, which is the safer next step when the injury is uncertain.
- Confirm that the original nail, screw, or other object is completely removed.
- Inspect the puncture location and compare it with the repairable tread area.
- Check the tool for bending, cracks, sharp burrs, or a loose handle.
- Ream the channel along its existing path, using controlled in-and-out strokes.
- Reload a correctly sized plug and attempt one steady insertion.
- Stop if the plug will not enter without extreme force or if the rubber begins tearing.
Do not stack plugs, cut one plug into several pieces, or use glue as a substitute for proper insertion. Those shortcuts can leave an unreliable seal and make later professional repair more difficult.
Checking for Leaks After the Plug Goes In
Once the plug is seated, trim the exposed ends nearly flush with the tread using a sharp blade. Do not pull the plug back out to reposition it; removal can reopen the channel and may require a different repair.
Inflate the tire to the vehicle manufacturer’s recommended cold pressure, found on the driver’s doorjamb label or in the owner’s manual. Then apply soapy water to the plug and valve area and watch for growing bubbles. Tiny bubbles that remain unchanged may be residue, but expanding bubbles indicate a leak.
- Plug seal: No expanding bubbles should appear around the repair.
- Valve and bead: Check these areas too, because the puncture may not be the only leak.
- Pressure: Recheck after the tire has sat and again before normal driving.
- Tire pressure system: Reset or monitor the vehicle’s TPMS only after the tire is correctly inflated.
A roadside string plug can restore pressure long enough to reach a repair facility, but it is not automatically the same as an internal patch-plug repair. A professional may inspect the inside, remove damaged material, and install a repair that seals the puncture from the interior while filling the channel.
Common Mistakes That Make Tire Plugs Hard to Insert
Many failed repairs come from technique rather than an unusually tough tire. Trying to insert the plug before reaming, using the wrong tool, or holding the tool at a different angle from the puncture creates friction at the narrowest point.
Another frequent mistake is working with an almost-flat tire while it is still supporting the vehicle’s weight. This can distort the contact patch and make the puncture harder to access. If the tire cannot hold air, use a safe inflation method or have it removed rather than driving on it.
- Skipping the leak location: A second leak at the valve or bead can be mistaken for a failed plug.
- Over-reaming: Making the opening larger can reduce the rubber’s ability to grip the plug.
- Forcing a dry plug: Excess friction can tear the plug or damage the insertion tool.
- Using an old plug: Dried, brittle rope may split instead of stretching into the channel.
- Ignoring tire age and wear: A puncture repair does not make a worn or damaged tire safe for continued use.
FAQ: Why Won’t My Tire Plug Go In?
How hard should it be to push in a tire
It should take firm, controlled pressure, but not repeated violent force or body weight. If the tool bends, the handle cracks, or the tread starts tearing, stop and reassess the plug size, reaming, and puncture location.
Do I need to ream the tire before inserting
Usually, yes. Reaming cleans the puncture and prepares a channel wide enough for the plug and insertion tool. Follow the kit’s instructions and use the original puncture path rather than enlarging the injury unnecessarily.
Can I use WD-40 or oil to make a tire
No. Use only the lubricant supplied with the kit or one specifically approved for tire rubber and plug installation. Petroleum-based products may affect rubber, and an oily surface can interfere with a dependable seal.
Why does the plug go into the tool but not
The tire channel may be too narrow, angled, obstructed, or not fully reamed. The tool could also be oversized or misaligned. Remove it, inspect the setup, and make one careful correction instead of forcing the tool through.
Can I plug a tire near the shoulder?
A puncture in or near the shoulder is generally not considered a suitable plug repair because that area flexes heavily. Have a tire professional evaluate it; replacement may be necessary.
What if the plug disappears inside the tire?
Do not rely on a plug that has been pushed completely into the casing. It may not seal the puncture correctly. Inflate only if it holds pressure safely, then have the tire inspected internally or replaced.
Is a tire plug a permanent repair?
A simple external plug is commonly treated as a temporary or limited repair. A tire professional can determine whether an internal patch-plug repair is appropriate after inspecting the tire’s inside and confirming that the injury is repairable.
Conclusion
When you wonder why won’t my tire plug go in, the most likely causes are an unprepared puncture, incompatible plug-and-tool sizing, poor alignment, or an unsafe or damaged repair area. Firm resistance is normal; extreme force is a warning to stop, inspect, and avoid enlarging the tire blindly.
Use the correct preparation method, test the finished repair for leaks, and treat any sidewall, shoulder, large, irregular, or internally damaged tire as a professional inspection or replacement issue.
If the plug will not enter with steady controlled pressure after proper reaming, stop forcing it and have the tire inspected before driving normally.