How to Replace Throttle Position Sensor: Complete DIY Guide Tips
A failing throttle position sensor can make a vehicle hesitate, surge, stall, or respond unpredictably when you press the accelerator. Because the sensor reports throttle angle to the engine computer, a bad signal can also turn on the check engine light and create confusing symptoms that resemble a fuel or ignition problem.
Learning how to replace throttle position sensor components is manageable on many older vehicles, but the exact procedure depends on whether the sensor is a separate bolt-on part or built into an electronic throttle body. The replacement must match the vehicle, and some models require a throttle or idle relearn after installation.
This guide explains how to identify the part, disconnect it safely, install the replacement without damaging the throttle body, clear diagnostic codes, and check the result. It also shows when testing should come before replacement, since a loose connector, damaged wiring, or a dirty throttle body can cause similar symptoms.
At a glance
- Confirm the replacement sensor and procedure for your exact year, make, model, and engine.
- Disconnect power before unplugging the sensor, and never force a connector or throttle plate.
- Verify the repair with a scan-tool check, a stable idle, and a cautious road test.
How to Replace Throttle Position Sensor Safely
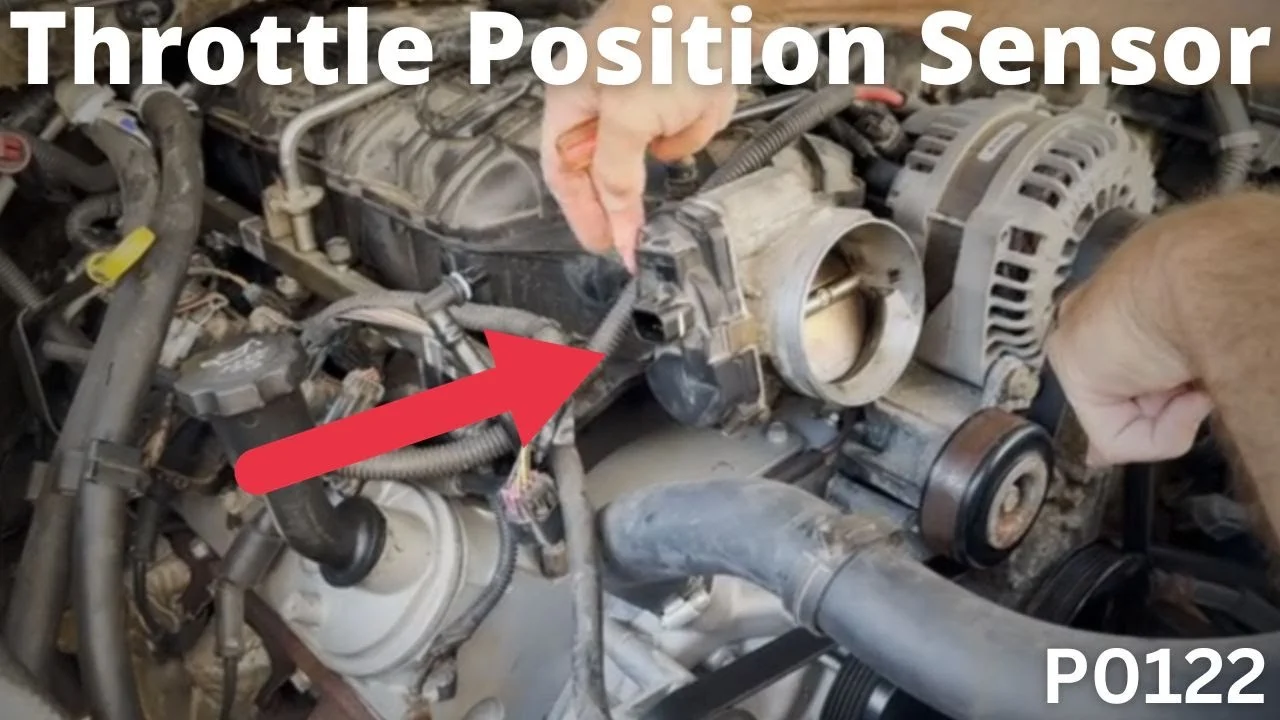
The basic process is to verify the diagnosis, prepare the vehicle, remove the old sensor, install the matching part, and complete any required relearn. A separate throttle position sensor is often mounted on the side of the throttle body where the throttle shaft enters the housing. On many newer vehicles, the sensor is integrated into the electronic throttle body, so replacing only the sensor may not be possible.
Tools you will need
- Correct replacement throttle position sensor or throttle body, matched to the vehicle identification number or exact application
- Basic socket and screwdriver set, including the bit type used by the original fasteners
- Digital multimeter for checking power, ground, and signal when diagnosis is uncertain
- OBD-II scan tool for reading and clearing codes and viewing live throttle-position data
- Safety glasses and work gloves
- Optional: vehicle service information for connector pinouts, torque specifications, and relearn instructions

Step 1 Confirm the sensor and the diagnosis
Park on a level surface, set the parking brake, switch off the ignition, and let the engine cool. Locate the throttle body by following the large air-intake tube from the air filter housing toward the engine. The throttle position sensor is usually attached to the throttle body, but its shape and mounting method vary considerably.
Before buying a part, read the stored diagnostic trouble codes with an OBD-II scanner. Codes such as P0120 through P0124 can point toward a throttle-position circuit problem, but a code alone does not prove that the sensor is defective. Look for a loose plug, bent terminals, rubbed-through wiring, corrosion, or an intake tube that has come loose.
If your vehicle has an electronic throttle body, do not assume a separate sensor is replaceable. Some units contain dual position sensors and require replacement of the complete throttle body. The parts catalog or service information should identify the correct assembly.
Important
Do not continue with a sensor-only replacement if the throttle plate is motor-driven and the sensor is integrated into the throttle body. Do not open or force an electronic throttle plate by hand; the motor and gears can be damaged.
Step 2 Prepare the vehicle and disconnect electrical power
Record any radio or memory settings that could be lost, then disconnect the negative battery cable if the service information permits it. This reduces the chance of an electrical short while the connector is unplugged. On some vehicles, disconnecting the battery can erase learned throttle or idle settings, so note that a relearn may be required afterward.
Keep the ignition key away from the vehicle while the battery is disconnected. If the vehicle uses a push-button start system, make sure it cannot be switched on accidentally. Do not disconnect the battery while the engine is running or while a battery charger is connected in a way that could create a voltage spike.
Remove only the air-intake parts that block access. Cover an open intake passage with a clean, lint-free cloth while working, but remove the cloth before reassembly. Dirt that enters the throttle body can affect the throttle plate and contaminate the new sensor area.
Step 3 Inspect the connector and wiring before removal
Press the locking tab and unplug the sensor connector without pulling on the wires. Examine both sides of the connection. The terminals should be straight, clean, and firmly retained in the plastic housing; green corrosion, moisture, pushed-back terminals, or broken insulation needs attention before a new sensor can work reliably.
Trace the wiring a short distance from the connector. Look for places where the harness contacts a bracket, exhaust component, or sharp edge. A damaged signal wire can produce the same symptoms as a defective throttle position sensor, and replacing the sensor alone will not correct that fault.
If the diagnosis is uncertain, use the wiring diagram for your vehicle to identify the sensor reference voltage, ground, and signal circuits. With the sensor connected and the ignition on, the reference and ground readings should match the specifications for that vehicle. Signal behavior should change smoothly as the throttle moves; the exact voltage range is not universal, so avoid applying a generic specification.
Step 4 Remove the old throttle position sensor
Note the sensor’s position and the routing of the wiring before removing it. Some sensors have locating tabs or a keyed shaft connection, while others use slotted mounting holes. Take a quick photograph if the orientation is not obvious.
Remove the retaining screws or bolts with the correct bit, supporting the sensor as the last fastener comes out. If a fastener resists, use firm downward pressure on the tool rather than twisting at an angle. A stripped fastener can turn a simple repair into throttle-body removal.
Pull the sensor straight away from the throttle body unless the service instructions specify a slight rotation to disengage the shaft. Do not pry against the throttle plate or use the sensor as a lever. Compare the old and new parts before installation: the connector, mounting holes, locating tab, shaft opening, and overall shape should agree.
A useful way to approach how to replace throttle position sensor is to check your progress after each stage.
Step 5 Install the matching replacement sensor
Clean the mounting surface with a dry, lint-free cloth. Do not spray carburetor cleaner or throttle-body cleaner into an electrical sensor, and do not add grease unless the manufacturer specifically calls for it. The replacement should seat without force; resistance usually means it is misaligned or the part is incorrect.
Engage the sensor with the throttle shaft or locating tab in the same orientation as the original. Install the fasteners by hand first, then tighten them evenly to the manufacturer’s specification. Avoid overtightening small screws in an aluminum throttle body, where damaged threads are difficult to repair.
Reconnect the electrical plug until its lock clicks or fully seats. Give the connector a gentle pull to confirm it is latched, but do not tug on the wires. Reinstall the air-intake tube, clamps, brackets, and any disconnected vacuum lines exactly as they were positioned.
Check your result
The sensor is seated flush, the fasteners are snug, the connector lock is engaged, and no intake hose or vacuum line remains disconnected. Nothing should touch the throttle linkage or interfere with throttle movement.
Step 6 Restore power and perform the required relearn
Reconnect the negative battery cable and tighten it securely. Turn the ignition on without starting the engine and watch for unusual warning lights, clicking, or a throttle body that behaves abnormally. Do not press the accelerator during this initial check unless the service procedure specifically instructs you to do so.
Follow the relearn procedure listed for your vehicle. Some vehicles relearn throttle position automatically after the ignition is cycled; others require a scan tool, a sequence of ignition and pedal actions, or an idle relearn. There is no universal procedure, so a method intended for another model can make the idle worse or fail to complete.
If the vehicle has a cable-operated throttle and a separate sensor, the relearn may be minimal. If it has an electronic throttle body, the engine computer may need to learn the closed-throttle position before it can control idle and acceleration correctly.
Step 7 Clear codes and check live sensor data
Connect the OBD-II scanner and record any remaining codes before clearing them. Clear the stored codes only after the replacement is installed and the wiring is connected. Some scanners can display throttle position as a percentage or show two related sensor signals; at rest, the values should be stable and should change smoothly as the accelerator is pressed.
Start the engine and let it settle without immediately revving it. Watch for a check engine light, unstable idle, delayed response, or a throttle-position reading that jumps while the accelerator remains still. If the engine computer reports a correlation or range-performance code immediately, switch the engine off and recheck the connector, part number, wiring, and relearn procedure.
Step 8 Complete a cautious road test
After the engine reaches normal operating temperature and the idle is reasonably stable, test the vehicle in a safe area away from traffic. Begin with gentle acceleration and confirm that the engine responds progressively without hesitation, surging, or an unexpected increase in speed.
Check several conditions, such as light acceleration, coasting, and returning to idle. Do not perform a road test if the throttle sticks, the vehicle accelerates without pedal input, the engine stalls repeatedly, or warning lights indicate a serious control-system fault. Those symptoms require further diagnosis before driving normally.
After the test, scan for pending codes as well as confirmed codes. A repair may turn off the dashboard light while a pending fault remains in memory. A clean scan, smooth live data, stable idle, and normal pedal response together provide stronger evidence of success than any one check alone.
What the Throttle Position Sensor Does
The throttle position sensor, commonly called the TPS, tells the engine control module how far the throttle is open. The computer uses that information along with airflow, engine speed, oxygen-sensor feedback, and accelerator-pedal data to calculate fuel delivery, ignition timing, transmission behavior, and idle control. Understanding how to replace throttle position sensor also means recognizing the limits of the method.
On a traditional cable throttle, the sensor is connected mechanically to the throttle shaft. On an electronic throttle system, the accelerator pedal sends a request to the computer, and an electric motor opens the throttle plate. Electronic systems commonly use redundant position signals so the computer can detect a disagreement, which is why a complete throttle-body replacement may be specified.
Typical symptoms include a hesitation when accelerating, an erratic idle, stalling when the throttle closes, limited-power or “reduced engine power” operation, and a check engine light. These signs overlap with faults in the mass airflow sensor, accelerator pedal position sensor, vacuum system, fuel system, and ignition system.

Why testing matters before replacement
A throttle position code can be caused by a missing reference voltage, poor ground, damaged signal wiring, or a connector that is not making contact. Use the vehicle’s wiring diagram and specifications when testing with a multimeter. A smooth signal is more important than a particular universal voltage number, because sensor designs differ.
Do not condemn a sensor because its scan-tool percentage is not exactly zero or 100 percent. The computer may display a scaled value, and the throttle may have a designed closed-angle position. Look for stable readings and a smooth change through the operating range.
How to Confirm the Repair
Verification should combine visual inspection, electronic checks, and driving behavior. A new part can be installed correctly yet fail to solve the problem if the original cause was wiring, an air leak, a dirty throttle body, or a different sensor.
- The connector is fully locked and the harness is not stretched, pinched, or resting against hot components.
- The intake tube and clamps are tight, with no open vacuum ports or disconnected breather hoses.
- The engine starts without an immediate warning light or unusual throttle movement.
- Throttle-position data changes smoothly rather than jumping, dropping out, or freezing.
- The idle remains stable after the relearn procedure and normal warm-up.
- No new pending or stored throttle-related codes return during the road test.
If the vehicle has an electronic throttle body, compare the commanded and actual throttle positions when the scanner provides both values. A persistent mismatch suggests a wiring, actuator, throttle-body, or control-module issue rather than a simple sensor installation problem.
Troubleshooting After Installation
If the vehicle still behaves poorly, avoid repeatedly clearing codes and replacing parts at random. Reinspect the work first, then use the code and live data to narrow the fault.
| Symptom | Likely areas to inspect |
|---|---|
| Check engine light returns immediately | Connector lock, bent terminals, reference voltage, ground, signal wiring, incorrect part, or failed relearn |
| High or unstable idle | Disconnected intake hose, vacuum leak, throttle plate contamination, lost idle memory, or an air leak after the airflow sensor |
| Hesitation remains | Accelerator-pedal sensor, fuel delivery, ignition, mass airflow sensor, wiring, or an unrelated stored code |
| Reduced-power message | Electronic throttle-body fault, disagreement between redundant signals, actuator problem, or control-system wiring |
When the new sensor does not fix the code
Compare the current code with the original code and check whether it returns immediately with the ignition on or only after driving. An immediate circuit code points more strongly toward wiring, power, ground, or connector problems. A performance or correlation code may involve sensor alignment, a throttle-body actuator, or a required relearn.
Check for technical service information that applies to the exact vehicle. Some models have known harness chafing points or software updates, and some require a scan-tool initialization that cannot be completed with a simple battery disconnect.
When to stop and get professional help
Stop the repair if the throttle body has damaged threads, the connector terminals are pushed into the housing, the wiring diagram does not match the vehicle, or the replacement part does not fit without force. Seek qualified help if the vehicle accelerates unexpectedly, enters reduced-power mode repeatedly, or cannot maintain a safe idle.
Professional diagnosis is also the safer choice when the vehicle uses an integrated electronic throttle body and the required programming or relearn equipment is unavailable. Driving with an unresolved throttle-control fault can create an unsafe loss of power or unintended acceleration response.
Throttle Position Sensor FAQs
These answers address common beginner questions that come up after identifying a suspected TPS problem.
Can I replace only the throttle position sensor?
Only when the vehicle uses a separate, serviceable sensor. Many electronic throttle bodies integrate the sensor with the motor and housing, requiring replacement of the complete assembly. Confirm the design from vehicle-specific service information or the correct parts listing.
Do I have to disconnect the battery?
Disconnecting the negative cable is a common precaution, but follow the vehicle’s service instructions. It can erase radio settings and learned throttle or idle values. Some procedures call for a scan tool instead, and certain vehicles have special precautions for battery disconnection.
Will a bad TPS prevent the engine from starting?
It can, but a no-start condition is not specific to the throttle position sensor. A failed signal may cause poor fueling or an incorrect idle strategy, while many no-start problems come from the battery, crankshaft-position sensor, fuel system, or ignition system.
Does a new sensor need calibration?
Some vehicles learn the sensor automatically, while others require a throttle or idle relearn. The correct process depends on the vehicle and engine-control system. Use the specified procedure rather than relying on a generic pedal sequence.
Can I clean the throttle body at the same time?
You can clean accessible carbon from a conventional throttle body when the service instructions allow it, but protect electrical components and do not force an electronic throttle plate. Cleaning may help an idle problem, but it does not repair a faulty sensor or damaged wiring.
Finish and Recheck the Repair
Knowing how to replace throttle position sensor parts is useful when the sensor is genuinely faulty and the replacement matches the vehicle. The safest approach is to inspect the circuit first, install the part without forcing the throttle mechanism, complete the required relearn, and verify both live data and real driving behavior.
Once the vehicle passes those checks, secure the wiring and intake components, clean up the work area, and keep the original diagnostic notes with the maintenance records. If the warning light returns or throttle control remains unpredictable, stop driving normally and have the circuit and electronic throttle system diagnosed before replacing more parts.